


27
Sediment and lime scale removal may be accomplished through
the cleanout opening furnished on the heater. The heater must
be drained, see DRAINING, before removing cleanout cover on
tank.
To dissolve and remove the more stubborn mineral deposits,
SRT80-120NE UN•LIME® Professional Delimer should be used.
SRT80-120NE UN•LIME® Professional Delimer is an easy to
handle patented food grade acid formulated specifically for lime
scale removal from all types of water using equipment. Available
in 1 gallon (3.8L) (part no. 4763) and 5 gallon (19L) (part no.
4813) sizes. Hydrochloric base acids are not recommended for
use on glass-lined tanks.
SRT80-120NE Form No. 4800, entitled “Why, When and How”,
describes tank cleaning methods and materials. UN•LIME and
the booklet may be obtained through your State dealer or
distributor.
To clean heater through cleanout opening, proceed as follow:
1. Turn off water inlet valve, the heater electrical disconnect switch
and open gate valve.
2. Drain the tank.
3. Remove cover from cleanout opening on front of tank assembly.
4. Remove lime, scale or sediment using care not to damage
the glass-lining.
5. Inspect cleanout plate gasket.
6. Install cleanout plate. Be sure to draw plate up tight by
tightening screws securely.
7. Close gate valve, open water inlet line and turn on the power
burner electrical disconnect switch.
8. Check for water leakage.
ANODE INSPECTION AND REPLACEMENT
This water heater is equipped with a sacrificial anode. Anodes
protect the glass-lined tank from corrosion by sacrificing
themselves through electrolysis. When the anode material is
consumed, there is no more protection and corrosion of the tank
accelerates
Inspection of the anode every 6 to 12 months allows you to identify
a spent anode and replace it. Replace the anode when its
diameter is 3/8" (1cm) of an inch, or annually which ever is first.
Aggressive, very hot and softened water causes rapid
consumption of the anode requiring frequent inspections. Anodes
are available from your distributor or State Industries.
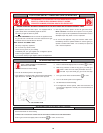
To inspect or replace an anode:
The anodes on this heater are easily accessible from the front of
the heater making replacement simple and quick.
1. Turn the heater off per the lighting instructions.
2. Open the drain valve to flush any sediment out of the bottom of
the heater.
3. Shut off the cold water supply. Make sure all hot water fixtures
and circulating pumps are turned off.
4. Make sure tank is drained. Remove the anode using a socket
of the appropriate size. Do not use an impact wrench.
5. Inspect and replace the anode as required. Use a pipe tape
or sealant when reinstalling the anode.
6. Close the drain valve. Open a hot water fixture to allow air to
escape. Open the cold water supply to heater and allow the
tank to fill. Follow the lighting instructions.
7. Check your anode and drain valve for leaks.
DRAIN VALVE AND ACCESS PANELS
The heater is equipped with a 3/4" drain valve.
An access panel covers the front of the tank.
RELIEF VALVE
At least twice a year, the temperature and pressure relief valve
should be checked to ensure that it is in operating condition. To
check the relief valve, lift the lever at the end of the valve several
times. The valve should seat properly and operate freely.
If water does not flow, remove and inspect for obstructions or
corrosion. Replace with a new valve of the recommended size as
necessary. Inspection of the valve should be performed at least
every three years. Do not attempt to repair the valve, as this could
result in improper operation and a tank explosion. In areas with
poor water conditions, it may be necessary to inspect the T&P
valve more often than every three years.
CAUTION
BEFORE MANUALLY OPERATING THE VALVE, MAKE SURE THAT
A DRAIN LINE HAS BEEN ATTACHED TO THE VALVE TO DIRECT
THE DISCHARGE TO AN OPEN DRAIN. FAILURE TO TAKE THIS
PRECAUTION COULD MEAN CONTACT WITH EXTREMELY HOT
WATER PASSING OUT THE VALVE DURING THIS CHECKING
OPERATION.
If the temperature and pressure relief valve on the heater
discharges periodically or continuously, it may be due to thermal
expansion of water in a closed water supply system, or, it may be
due to a faulty relief valve.
Thermal expansion is the normal response of water when it is
heated. In a closed system, thermal expansion will cause the
system pressure to build until the relief valve actuation pressure is
equaled. Then, the relief valve will open, allowing some water to
escape, slightly lowering the pressure.
Water heater damage due to installation in a closed system is
not covered by the limited warranty. The solution is to install a
thermal expansion tank between the check valve and the water
heater.
ABOVE ALL, DO NOT PLUG THE TEMPERATURE AND PRESSURE
RELIEF VALVE. THIS IS NOT A SOLUTION AND CAN CREATE A
HAZARDOUS SITUATION.
CIRCULATING PUMP
The water heating system includes several circulating pumps.
It should be lubricated as directed by the circulator
manufacturer.
VENT SYSTEM
Examine the vent system every 3 months. Points of inspection are
as follows:
1. Check for obstructions and/or deterioration of vent terminals.
2. Vent from screen should be cleaned of foreign material and
soot. The screen is located inside the vent outlet and is
accessible from the outside of the hood. Do not reach inside
the vent terminal when the heater is in operation.
3. Check all vent system connections for leakage and reseal as
required using Hi Temp Silicone sealer or equivalent (inside
cabinet).