


10
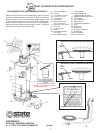
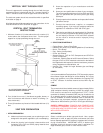
VERTICAL VENT THROUGH ROOF
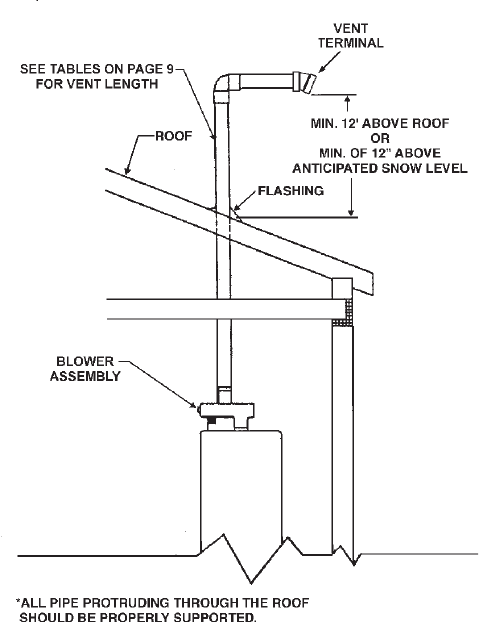
This unit is approved for venting through the roof with the type
vent terminal that is included with the unit. A proper flashing or
“BOOT” should be used to seal the pipe where it exits the roof.
The total vent system should not exceed that which is specified
in the table on page 9.
All of the pipe should be secured as per the instructions in the
“INSTALLATION OF VENT SYSTEM” on page 9.
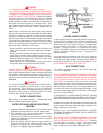
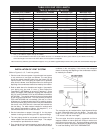
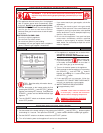
VERTICAL VENT TERMINATION
RESTRICTIONS
1. Minimum of twelve (12) inches above the roof or twelve (12)
inches above the anticipated snow level. Provide proper
support for all pipe protruding through the roof.
FIGURE 8
2. Four (4) feet from or one (1) foot above any gable, dormer, or
other roof structure with access to interior of building (i.e.-
vent, window etc.).
3. Three (3) feet above any forced air inlet located within ten (10)
feet.
VENT PIPE PREPARATION
1. INITIAL PREPARATION
A. Make sure the solvent cement you are planning to use is
designed for the specific application you are attempting.
B. Know the physical and chemical characteristics and
limitations of the PVC and CPVC piping materials that
you are about to use.
C. Know the reputation of your manufacturer and their
products.
D. Know your own qualifications or those of your contractor.
The solvent welding technique of joining PVC and CPVC
pipe is a specialized skill just as any other pipe fitting
technique.
E. Closely supervise the installation and inspect the finished
job before start-up.
F. Contact the manufacturer, supplier, or competent
consulting agency if you have any questions about the
application or installation of PVC and CPVC pipe.
G. Take the time and effort to do a professional job. Shortcuts
will only cause you problems and delays in start-up. By
far, the majority of failures in PVC and CPVC systems
are the result of shortcuts and/or improper joining
techniques.
2. SELECTION OF MATERIALS
• Cutting Device - Saw or Pipe Cutter
• Deburring Tool, Knife, File, or Beveling Machine (2" and above)
• Brush - Pure Bristle
• Rag - Cotton (Not Synthetic)
• Primer and Cleaner
• Solvent Cement - PVC for PVC Components and CPVC for
CPVC Components
• Containers - Metal or Glass to hold Primer and Cement. Select
the type of PVC or CPVC materials to be used on the basis of
their application with respect to chemical resistance, pressure
rating, temperature characteristics, etc.
• Insertion Tool - Helpful for larger diameter pipe and fittings
(6" and above).
PRIMER
It is recommended that Tetrahydrofuran (THF) be used to prepare
the surfaces of pipe and fittings for solvent welding. Do not use
water, rags, gasoline or any other substitutes for cleaning PVC
or CPVC surfaces. A chemical cleaner such as MEK may be
used.
CEMENT
The cement should be a bodied cement of approximately 500 to
1600 centipoise viscosity containing 10-20% (by weight) virgin
PVC material solvated with tetrahydrofuran (THF). Small
quantities of dimethyl formamide (DMF) may be included to act
as a retarding agent to extend curing time. Select the proper
cement; Schedule 40 cement should be used for Schedule 40
pipe. Never use all-purpose cements, commercial glues and
adhesives or ABS cement to join PVC or CPVC pipe and fittings.
SAFETY PRECAUTION: PRIMERS AND CEMENTS ARE
EXTREMELY FLAMMABLE, AND MUST NOT BE STORED OR
USED NEAR HEAT OR OPEN FLAME. ALSO, USE ONLY IN A
WELL-VENTILATED AREA.
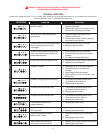
APPLICATORS
Select a suitable pure bristle type paint brush. Use a proper
width brush or roller to apply the primer and cement (see chart
below). Speedy application of cement is important due to its fast
drying characteristics. IMPORTANT NOTE: A dauber type
applicator should only be used on pipe sizes 2" and below. For
larger diameter pipe, a brush or roller must be used.