


Regency Z2510 WarmHearth 19
INSTALLATION
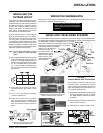
MASONRY LINER/
BRICKS
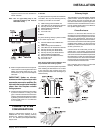
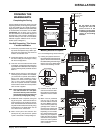
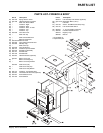
Insulated refractory panels are included to
extend the life of the fi replace and help radiate
heat more evenly. Make sure Insulating Paper
is in place along the bottom, side and rear before
bricks are put into place. Insulation batt, 1 in.
thick is placed above the top brick baffl e.
Using the diagram to fi nd the correct location
of the panels install in the following sequence:
sides, rear, bottom, top. Care should be taken
not to damage the panels during installation.
THE LOG ANDIRONS SHOULD NOT BE
REMOVED.
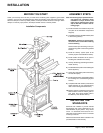
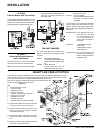
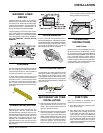
LOUVERS
The unit comes with standard black louvers but
can have Gold Plated Louvers as an option.
There are 2 sets of louvers: the top consists of
4 louvers and the bottom has 5 louvers.
To attach the louvers fi rst slide 2 spring nuts
into place making sure the smaller holes are on
the back of the unit. Louvers are held in place
by feeding the two screws through the spring
nuts. Louvers can be removed by inserting a
screw driver between the louvers and removing
the screws.
GLASS INSTALLATION
Remove the wire retainer from the door, and
place the glass in the door, making sure that
the glass gasketing will properly seal your unit.
The retainer should be resting on the gasketing
not on the glass. Tighten securely, but do not
wrench down on the glass as this may cause
breakage. Do not substitute materials. If your
glass door breaks, do not use your unit until it
has been replaced (refer to the Glass Replace-
ment section).
DOOR HANDLE
The unit comes with a standard black door or
optional gold plated door. After the unit has been
installed and the facing completed place the door
onto the door hinges. Put hinge cover caps on
top of hinge to complete the door. Install the
gold spring handle onto the handle bar.
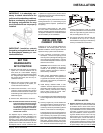
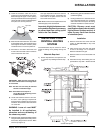
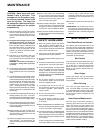
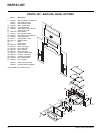
Washers Spacer
LATCH ADJUSTMENT
The door latch may require adjustment as the
door gasket material compresses after a few
fi res. Removal of the spacer washer shown
in the diagram below will allow the latch to be
moved closer to the door frame, causing a tighter
seal. Remove and replace the nuts, washer and
spacer as shown.
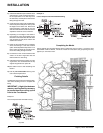
SECONDARY AIR TUBE
INSTALLATION
1) Slide air tube into the hole on the left hand
side of the fi rebox as far as it will go. The
notch in the air tube should be facing the
right hand side of the fi rebox.
2) Slide the air tube back towards the right side
until it locks into place. To lock into position,
use a pair of vise grips and tap them with a
mallet until the tube locks into place. The air
holes should be pointing down toward the
primary air opening just inside the bottom
of the door opening. The air tube will be
diffi cult to snap into place because it has
to be a snug fi t in order to prevent it from
falling out when a fi re is burning.
OPERATING
INSTRUCTIONS
Draft Control
Both the primary and air wash drafts are control-
led by the control rod located under your ash
lip. To increase your draft, push left for open, to
decrease push right for closed. The draft control
box is removable should it require attention.
From time to time a high temp lubricant may be
needed to keep the draft control sliding easily.
It must, however, be re-sealed with RTV, high
temperature silicone, when replaced.
FIRST FIRE
When your installation is completed and in-
spected you are ready for your fi rst fi re.
1) Open draft control fully. To the left is open,
to the right is closed.
2) Open fi rebox door and build a small fi re
using paper and dry kindling. Secure door
on the fi rebox and wait a few minutes for
a good updraft in the fl ue to establish the
fi re. Leaving the door slightly open will help
your fi re start more rapidly and keep glass
clean. Add more kindling; then 2 x 2 or 2 x
4 softwood to establish a hot coal bed before
adding larger cordwood.