


Regency
®
P121-2/P121LC-2/P121RC-2/P131-2 Zero Clearance Direct Vent Gas Fireplace 11
B
C
A
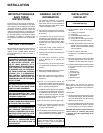
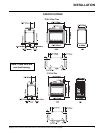
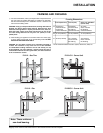
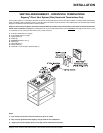
FRAMING AND FINISHING
P121-2 - See Thru
P131-2 - Pier
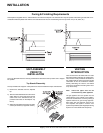
Framing Dimensions
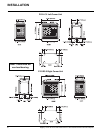
P121-2 (See Thru) P131-2 (Pier) P121LC-2 / P121RC-2
(Corner Unit)
A 25"(635mm) 25"(635mm) 26-13/16"
minus two times minus two times minus one time
the fi nishing the fi nishing the fi nishing
material thickness* material thickness* material thickness*
B 42-1/2"(1080mm) 42-1/2"(1080mm) 42-1/2"(1080mm)
C 46-3/4"(1187mm) 45" (1143mm) 45"(1143mm)
minus one time minus one time
the fi nishing the fi nishing
Note: These units are
non-load bearing.
P121LC-2 - Corner Unit
* Finish material thickness includes: drywall, ceramic tile, slate, etc.
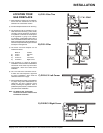
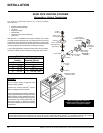
1) For ease of installation, frame your fi replace after it is positioned and
the vent system is installed. Remember to install the top standoffs.
See the "Unit Assembly Prior to Installation" section. Use 2x4's and
frame to local building codes.
CAUTION: Verify your fi replace dimensions, framing methods and
fi nished wall facing details before framing. Determine the total
thickness of facing material - drywall plus ceramic tiles, slate, etc.
Allow the fi nish surface to be fl ush with the front or side of the
unit. Total facing thickness can vary from 1/2" (13mm) to 1-1/4"
(32mm) thick.
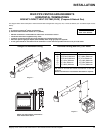
2) When locating your appliance on an exterior wall or in a chase, apply
a vapour barrier and drywall, as per local building codes. DO NOT
INSULATE THE FIREPLACE ITSELF.
CAUTION: The unit does not have to be completely enclosed in
a chase. The clearance on top of the unit is 0" to the standoffs
so combustible building materials can be laid directly on top
of the standoffs. You must maintain clearance from the vent to
combustible materials for both rigid and fl ex, see Vent Clearances
in the "Clearances" section.
P121RC-2 - Corner Unit
INSTALLATION