


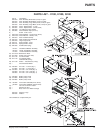

Regency Insert & Hearth Heater6
INSTALLATION
CHIMNEY
SPECIFICATIONS
Before installing, check and clean your chim-
ney system thoroughly. If in doubt about its
condition, seek professional advice. Your Re-
gency Insert is designed for installation into a
masonry fireplace that is constructed in ac-
cordance with the requirements of "The Stand-
ard for Chimneys, Fireplaces, Vents, and Solid
Fuel Burning Appliance", N.F.P.A. 211, the
National Building Code of Canada, or the appli-
cable local code requirements.
The appliance, when installed, must be electri-
cally grounded in accordance with local codes
or, in the absence of local codes, with the
National Electrical Code, ANSI/NFPA 70, or the
Canadian Electrical code, CSA C22.1.
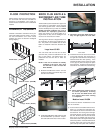
Regency Inserts are designed with a 6" flue.
Requirements for Installing
Solid-fuel Inserts in Factory-built
Fireplaces.
1) The insert must be tested and meet the
requirements of UL 1482 (U.S.) and or ULC
S628 (Canada) when tested in a masonry
fireplace built per ULC S628.
2) The factory-built fireplace must be listed
per UL 127 or ULC S610.
3) Clearances obtained from the masonry fire-
place tests are also relevant for installation
in factory-built fireplaces.
4) Installation must include a full height listed
chimney liner type HT requirements (2100
degree F.) per UL 1777 (U.S.) or ULC S635
(Canada). The liner must be securely at-
tached to the insert flue collar and the
chimney top.
5) Means must be provided to prevent room air
passage to the chimney cavity of the fire-
place. This may be accomplished by sealing
the damper area around the chimney liner,
or sealing the fireplace front.
6) The air flow within and around the fireplace
shall not be altered by the installation of the
insert (i.e. no louvers or cooling air or outlet
ports are blocked), unless specifically test-
ed as such for each factory-built fireplace
manufacturer and model line. (Note - using
a louvered face plate (surround) complies
with this requirement).
7) Alteration of the fireplace in any manner is
not permitted with the following excep-
tions;
a. external trim pieces which do not affect
the operation of the fireplace may be
removed providing they can be stored
on or within the fireplace for re-assem-
bly if the insert is removed.
b. the chimney damper may be removed to
install the chimney liner.
8) Circulating air chambers (i.e. in a steel
fireplace liner or metal heat circulator) shall
not be blocked.
Regency Inserts are constructed with the high-
est quality materials and assembled under strict
quality control procedures that insure years of
trouble free and reliable performance.
It is important that you read this manual thor-
oughly and fully understand the safe installa-
tion and operating procedures. The more you
understand the way your Regency Insert op-
erates, the more enjoyment you will experience
from knowing that your unit is operating at peak
performance.
BEFORE INSTALLING
YOUR INSERT
1) Read all instructions before installing and
using your fireplace insert. Install and use
only in accordance with manufacturer’s
installation and operating instructions.
2) Check your local building codes - Building
Inspection Department. You may require a
permit before installing your insert. Be aware
that local codes and regulations may over-
ride some items in the manual.
WARNING: Careless installation is the
major cause of safety hazard. Check
all local building and safety codes
before installation of unit.
3) Notify your home insurance company that
you plan to install a fireplace insert or hearth
heater.
4) Your fireplace insert is heavy and requires
two or more people to move it safely. The
insert can be badly damaged by mishan-
dling.
5) If your existing fireplace damper control will
become inaccessible once you have in-
stalled your Regency Insert, you should
either remove or secure it in the open
position.
6) Inspect your fireplace and chimney prior to
installing your insert to determine that it is
free from cracks, loose mortar or other
signs of damage. If repairs are required,
they should be completed before installing
your insert. Do not remove bricks or mortar
from your masonry fireplace.
7) Do not connect the insert to a chimney
system servicing another appliance or an
air distribution duct.
9) Means must be provided for removal of the
insert to clean the chimney flue.
10) Inserts that project in front of the fireplace
must be supplied with appropriate support-
ing means.
11) A permanent metal warning label must be
attached to the back of the fireplace stating
that the fireplace must be restored to its
original condition for safe use with out the
insert.
In order for a solid-fuel insert to be certified for
use in factory-built fireplaces, the above infor-
mation must be clearly stated in the installation
manual and appropriate markings. Final ap-
proval is contingent on the authority having
jurisdiction.
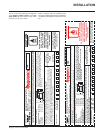
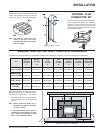
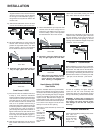
FIREPLACE
SPECIFICATIONS
Your fireplace opening requires the following
minimum sizes:
Height Width Depth
Small (I1100S) 20" 23" 13.25"
Medium (I2100M) 21.5" 25" 17"
Large (I3100L) 25" 28" 17"
Hearth Heater (H2100M) 20.0" -- --
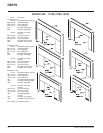
Two faceplates are available to seal the fire-
place opening:
Standard Oversize
Small (I1100S)
36"W x 26"H 39.875"W x 30"H
Medium (I2100M)
40"W x 30"H 48"W x 33"H
Large (I3100L)
44"W x 32"H 50"W x 34.5"H
Hearth Heater (H2100M)
40 1/4"W x 30"H 48"W x 33"H
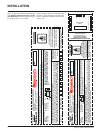
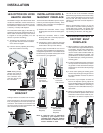
INSTALLING YOUR
INSERT
Your insert is very heavy and will require two
or three people to move it into position. The
insert can be made a little lighter by removing the
cast iron door by opening it and lifting it off its
hinges. Be sure to protect your hearth exten-
sion with a heavy blanket or carpet scrap
during the installation.
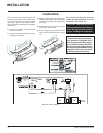
Convection Grills for
I2100M & I3100L
The convection grills are installed before the
unit is positioned inside the fireplace.
Emissions from burning wood or gas could
contain chemicals known to the State of
California to cause cancer, birth defects or
other reproductive harm.