


Page 4
• The locked or unlocked pad-
lock (windshield) reflects the
true locked or unlocked status
of the doors (certain pro-
grammable features can auto-
matically arm the system, but
not lock the doors). Arming
with the transmitter/trans-
ceiver always locks the doors;
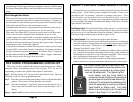
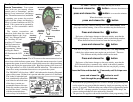
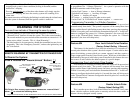
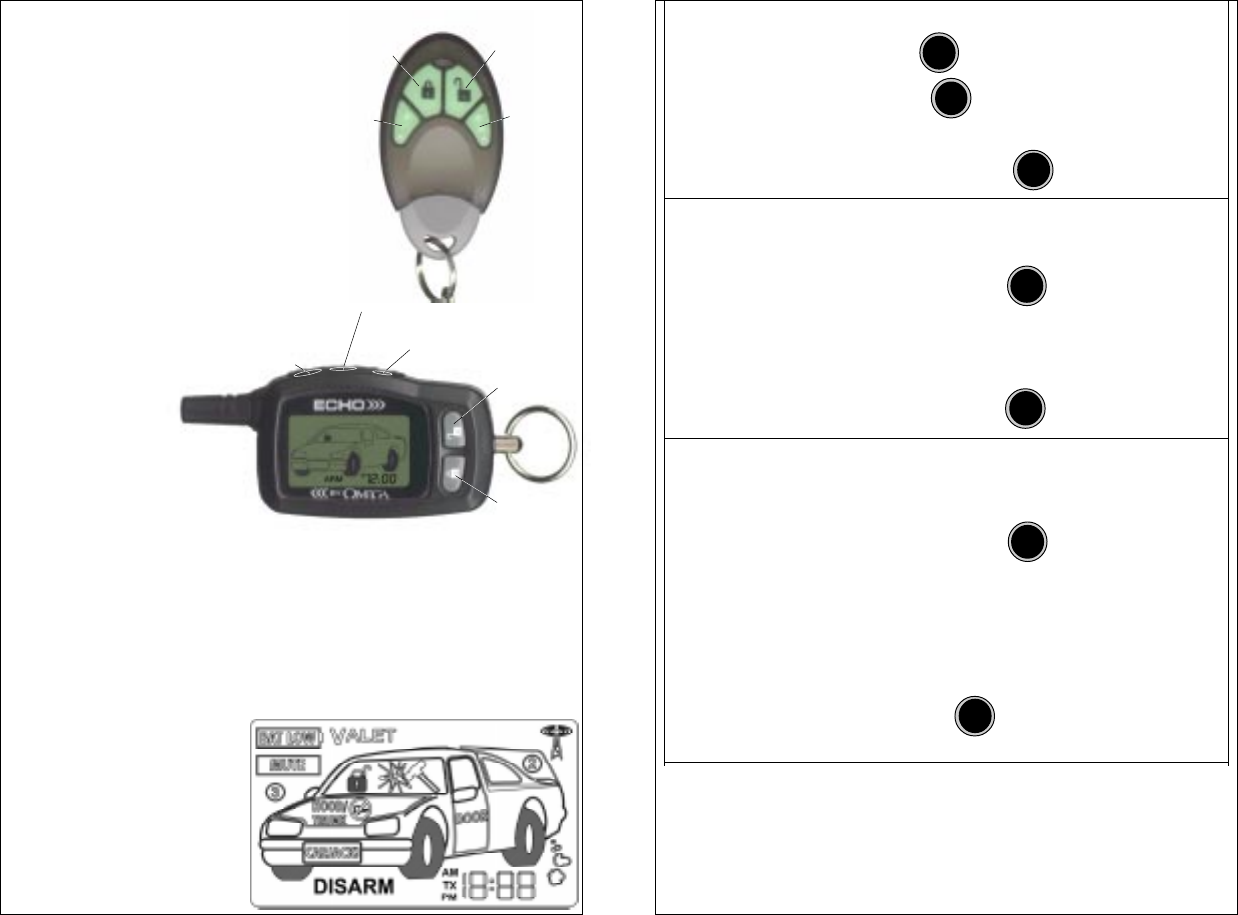
“Disarm/Unlock”
Button
“Arm/Lock”
Button
“Auxiliary
#2”
Button
“Auxiliary
#3”
Button
Remote
1-Way
Transmitter
“Arm/Lock”
Button
“Disarm/Unlock”
Button
“Auxiliary
Output #3”
Button
“Auxiliary
Output #2”
Button
Programming
Button
Echo
Remote
2-Way
Transceiver
The Remote Transmitter and
Remote Transceiver: Your system
comes with two pre-learned remote
controls; one is a “transmitter”, and the
other is a 2-way “transceiver”, the Omega
Echo. The remote transceiver, in addition
to operating your system, also receives
signals from the system, and displays a
variety of system conditions on its LCD
screen. Your system can be operated by
as many as four transmitters and/or
transceivers.
The remote transmitter and
transceiver both share the same four
operational buttons- the “Arm
/Lock”, the “Disarm/Unlock”,
the “Auxiliary #2” and
“Auxiliary #3” buttons.
The Echo transceiver
has a fifth button, the
“Programming” button;
pressing this button
will illuminate the LCD
screen.
Remote Transceiver Icons: The LCD screen on the remote transceiver has
various icons which indicate system status. When the remote transceiver is used
to operate the system, it receives back a signal which causes it to chirp (emulating
the siren) and display the appropriate icons. Brief descriptions of the icons are:
• The digit readout is a clock, with AM and PM indication. This readout also
shows how many transmitters/transceivers can operate the system.
• The “DISARM” will also show “ARM”; this indicates the Armed or Disarmed
status of the system. Neither icon is present when the system is in Valet Mode.
Page 45
The Echo will play a musical melody; this is the Start Melody which
plays upon remote starting. One of five melodies may be chosen now.
Each press of the button changes to the next melody, note that the
LCD screen displays “S” and a numeral, which is the melody number.
When the desired musical tone has been the last one played
Press and release the button
..
press and release the button
P
The Echo will play another musical melody; this is the Stop Melody
which plays when remote start engine run period ends. There are
five different melody choices which can be made.
Each press of the button changes to the next melody, note that the
LCD screen displays a numeral only, which is the melody number.
When the desired musical tone has been the last one played, you may
Press and release the button
..
P
leave the Echo undisturbed for 12 seconds, until it chirps once
OR
press and release the button to scroll
back through the programmable features.
The Time’s “Minutes” will flash, and may be set now.
Press and release the button to advance the minutes or
..
press and release the button to reverse the minutes.
...
When the minutes are correct
press and release the button
P
• While the Echo programming must be “scrolled” through, programming mode
can be exited at any point within the menu by simply not pressing any but-
tons for 12 seconds. The Echo chirps once when it exits programming mode.
• If the “MUTE” vibrating operation is selected, turning off the chirps, the
remote starting melodies are also replaced by vibration.
• The previous also applies to the musical melodies when programming- if the