


74D3000
18
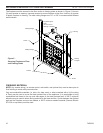
BLDV7 Series Gas Fireplace
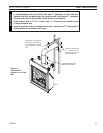
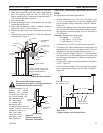
Guide the vent terminations 4” and 7” collard into their
respective vent pipes. Double check that the vent pipes
overlap the collars by ” (51 mm). Secure the termina-
tion to the wall with screws provided and caulk around
the wall plate to weatherproof. As an alternative to screw-
ing the termination directly to the wall, you may also use
expanding plugs or an approved exterior construction ad-
hesive. You may also attach the termination with screws
through the inner body into the 4” vent pipe, however for
this method, you must extend the 4” pipe approximately
6” (15 mm) beyond the outer face of the wall.
The 40” (1016 mm) flex vent is used for 90° bend
after a straight vertical section (1" min.) then out the
back wall.
Follow Steps 1 - 3 on Page 17.
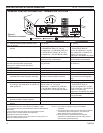
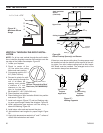
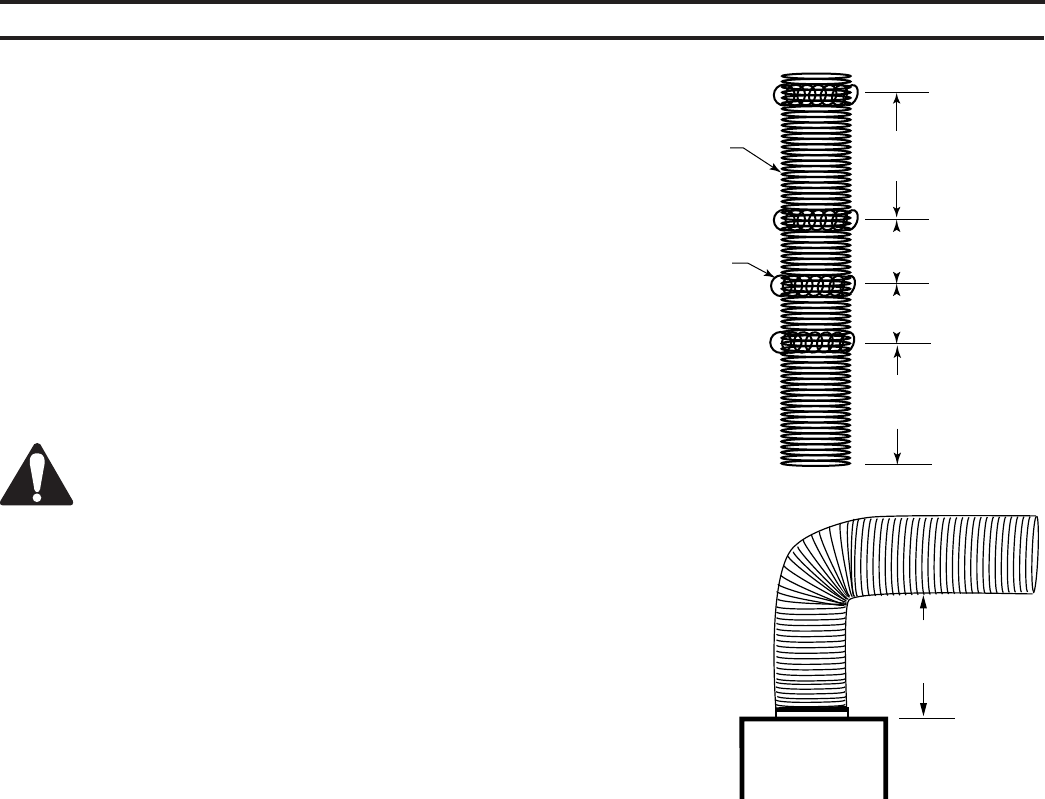
Install the four (4) spacer springs on the 4” flex vent pipe.
When installing the spacer springs around the 4” pipe,
stretch the spring to approximately 15” (381 mm), wrap
the spring around the pipe and interlock the ends of the
spacer spring approximately ” (51 mm). Measure 18C\v”
(476 mm) from the end of the pipe. Place the next spring
5” (17 mm) from the previously installed spring. Place
the next spring 6” (15 mm) from the last spring. Finally
place the last spring 1” (305 mm) from the last spring
installed. Figure 19
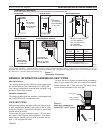
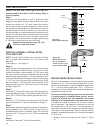
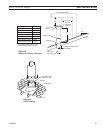
Install the 4” (10 mm) flex vent pipe to the appliance col-
lar as described on Page 13. Secure the end with the first
spring 18C\v” (476 mm) from the flex pipe end to the unit.
Slide the 7” (178 mm) flex vent pipe over the 4” flex vent
pipe and secure the 7” collar as described on Page 13.
Bend the flex pipe horizontal so the bottom of the horizon-
tal pipe measure 18Z\x” (470 mm) from the top of the unit
immediately after the 90° formation. Figure 20. Be sure to
follow the 1/” (13 mm) rise in a 1” (305 mm) horizontal
run rule.
Install the 4” flex then 7” flex to the termination.
12"
(305 mm)
6"
(152 mm)
5"
(127 mm)
186M"
(476 mm)
FP1474
spacer springs
4/04 djt
4" Flex
Vent Pipe
Spacer
Spring
FP1474
Figure 19 -
Install Spacer Springs
1856O"
(470 mm)
FP1475
flex 90 bend
4/04 djt
Figure 20 -
Bend Flex Vent at
90° so Horizontal
Portion is 18Z\x" (470
mm) Off Top of Unit
FP1475
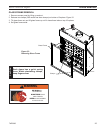
When it is not possible to meet the required vent terminal
clearances of 1” (305 mm) above grade level, a snor-
kel kit is recommended. It allows installation depth down
to 7” (178 mm) below grade level. The 7” (178 mm) is
measured from the center of the horizontal vent pipe as it
penetrates through the wall.
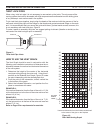
If installing a snorkel, a minimum 4” (610 mm) vertical
rise is necessary. The maximum horizontal run with the
4” vertical pipe is 36” (914 mm). This measurement is
taken from the collar of the fireplace (or transition elbow)
to the face of the exterior wall. See the Sidewall Venting
Graph for extended horizontal run if the vertical exceeds
4” (610 mm).
1. Establish vent hole through the wall. Page 17, Figure
16