


20
21
Automatic light baths
First, set the time the light bath is required to
commence.
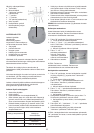
1. Press the “M” button until the light symbol (g) is
shown in the display, then press the “Enter” button.
o The hour number ashes.
2. Press the buttons “+” and “-“ in order to set the
hours and press the “Enter” button to conrm the
setting.
o The minute number ashes.
3. Press the buttons “+” and “-“ in order to set the
minutes and press the “Enter” button to conrm the
setting.
o The start time has now been set.
4. Set the duration of the light bath by pressing the
“Enter” button.
o 0:30 ashes in the display.
o Adjust the length by pressing the “+” and “-“
buttons. Each push increases the length by 15
minutes.
o Conrm the set time pressing the “Enter” button.
5. The light bath begins at the time set.
o The appliance automatically switches off, once
the set time has lapsed.
NOTE: The light bath can be disabled by pressing the
“M” button until the light symbol goes out in the display.
NOTE: Default setting is 30 minutes. This setting can
be adjusted using the buttons “+” and “-“. Max setting
is 2 hours.
Automatic light bath with alarm clock function
First, set the time the light bath is required to
commence.
1. Press the “M” button until the alarm clock symbol
and the light symbol ash in the display, then press
the “Enter” button.
o The hour number ashes.
2. Press the buttons “+” and “-“ in order to set the
hours and press the “Enter” button to conrm the
setting.
o The minute number ashes.
3. Press the buttons “+” and “-“ in order to set the
minutes and press the “Enter” button to conrm the
setting.
4. Set the duration of the light bath by pressing the
“Enter” button.
o 0:30 ashes in the display.
o Adjust the length by pressing the “+” and “-“
buttons. Each push increases the length by 15
minutes.
o Conrm the set time pressing the “Enter” button.
5. The light bath begins at the time set.
o The alarm beeps 2 minutes after the light bath
has commenced.
o The alarm clock beeps for 20 seconds and
then for a further 7 x 20 seconds at intervals at
5 minutes.
o The alarm clock symbol ashes while the alarm
clock beeps.
o The appliance automatically switches off, once
the set time has lapsed.
6. Press either of the buttons “M”, “Enter”, “+” or “-“ to
turn the alarm off.
7. Turn off the alarm clock permanently by pressing the
“Enter” button and holding down the button for 5
seconds.
o The alarm is switched off and the alarm clock
symbol stops ashing.
NOTE: The light bath with alarm clock function can be
disabled by pressing the “M” button until the alarm
clock symbol and the light symbol go out in the display.
NOTE: Default setting is 30 minutes. This setting can
be adjusted using the buttons “+” and “-“. Max setting
is 2 hours.
Reset all settings
• Press Reset button ( i ) to reset all settings.
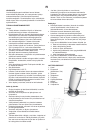
REPLACEMENT OF LIGHT TUBES
The lifetime of the uorescent tubes is approx. 8,000
hours of normal use. If a tube fails, it must be replaced.
• IMPORTANT! Discard used uorescent tubes in
accordance with the rules for environmentally
harmful waste, e.g. by taking them to a waste
recovery site.
• IMPORTANT! Always make sure to switch off the
appliance and remove the plug from the mains
socket before taking it apart to avoid the risk of
electric shocks.
• IMPORTANT! The screws of the appliance may be
of different types. Therefore, pay attention to which
screws belong to the different screw holes in order
to place them correctly when reassembling the
appliance.
How to dismantle the appliance
• IMPORTANT! Always make sure to switch off the
appliance and remove the plug from the mains
socket before taking it apart to avoid the risk of
electric shocks.
• Place the appliance on a non-scratching surface,
screen down.
• Remove the three screws from the rear base (4) with
a Phillips screwdriver, and gently detach the rear
and front bases (8) from the appliance.
IMPORTANT! Very carefully detach the two base parts,
since they are connected to the rest of the appliance
with cords that must not be damaged.
• Remove the top cover (1) by unfastening it with your
ngers, rst in one side and then in the other.
• Remove the 9 screws along the side of the rear part.
• Carefully remove the rear part, turn it upside down
and put it down in front of you.
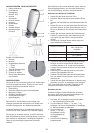
• Replace the starting switch (if applicable):
o Turn the starting switch (b) anti-clockwise and
remove it.
o Insert a new starting switch of the same type and
turn it clockwise until it locks into place.
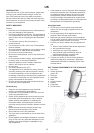
• Replace the uorescent tubes:
o Remove the locking clip (c) by pushing the ends
upwards until they click into place and remove
the clip.