


18
19
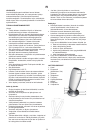
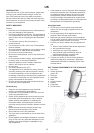
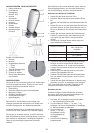
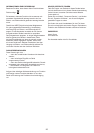
Display and control buttons
a. Hours
b. Minutes
c. “Enter” button (select)
d. “-” button
e. “+” button
f. “M” button (setting)
g. Light symbol
h. Alarm clock symbol
i. Reset button (rear side on
base)
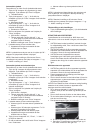
USING THE APPLIANCE
The appliance is used for light
baths that counteract winter
fatigue. which can cause the
following symptoms:
• fatigue
• bad mood or moodiness
• lack of energy
• increased need for sleep
• lack of concentration
• lack of appetite
Over 60% of the population are believed to experience
one or more symptoms of winter blues due to the low
intensity of the winter sun.
The most effective time of day to take a light bath is
between 6 am and 8 pm for a recommended period of
2 hours per day.
You can take a light bath as often as you like, but
treatment is most effective when you take one for the
times below for at least 5 successive days.
The appliance can be used as a standard light therapy
lamp, or as a sunrise alarm clock simulating the sunrise
for half an hour.
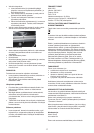
Using the appliance for light baths
• Place the appliance on a table.
• Plug in and switch on the power.
• Switch on the on/off button (9).
• Sit in front of the appliance so that you can see the
light easily and with your face 20-60 cm from the
screen (2). You do not need to sit directly in front of
the screen.
• Use the hinge on the base (5) to tilt the appliance.
Hold the top cover, and tilt the appliance to the
required angle.
• How long your light bath should last depends on the
distance you sit from the screen:
• You can take a break during the session, and you
can do other things whilst bathing (e.g. read or
watch TV) as long as you sit within 60 cm of the
appliance.
• Do not look directly into the light constantly, but
look at it regularly.
• Always turn off the appliance using the on/off
button, and unplug it, when it is not in use.
• Allow the appliance to cool for at least 15 minutes
before putting it away or moving it.
TIP: Carry the appliance by the carrying handle on the
top of the rear part (3).
Setting the clock
Insert 2 alkaline AA batteries before setting the clock.
The batteries are back up for the alarm clock in case of
power failure.
1. Press the “M” button (f) and hold it in.
o The hour number (a) ashes.
2. Press the buttons “+” (e) and “-“ (d) in order to set
the hours and press the “Enter” button (c) to conrm
the setting.
o The minute number (b) ashes.
3. Press the buttons “+”
and “-“ in order to set the
minutes and press the
“Enter” button to conrm
the setting.
4. The clock has now been
set.
NOTE: The batteries need replacing once a year. The
batteries are located in the battery compartment as
shown in the picture.
Setting the alarm clock
1. Press the “M” button until the alarm clock symbol
(h) is shown in the display (7), then press the “Enter”
button.
o The hour number ashes.
2. Press the buttons “+” and “-“ in order to set the
hours and press the “Enter” button to conrm the
setting.
o The minute number ashes.
3. Press the buttons “+” and “-“ in order to set the
minutes and press the “Enter” button to conrm the
setting.
o The alarm clock has now been set.
4. The alarm clock beeps for 20 seconds and then for
a further 7 x 20 seconds in intervals at 5 minutes.
o The alarm clock symbol ashes while the alarm
clock beeps.
5. Press either of the buttons “M”, “Enter”, “+” of “-“ to
turn the alarm off.
6. Turn off the alarm clock permanently by pressing the
“Enter” button and holding down the button for 5
seconds.
NOTE: The alarm function can be disabled by pressing
the “M” button and holding it in until the alarm clock
symbol disappears from the display.
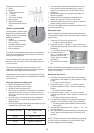
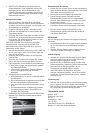
Distance to screen
60 cm
40 cm
20 cm
Max. length of light
bath
Approx. 2 hours
Approx. 1 hour
Approx. ½ an hour
i