


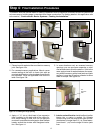
Step 3: Installing the Window
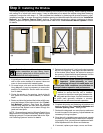
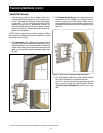
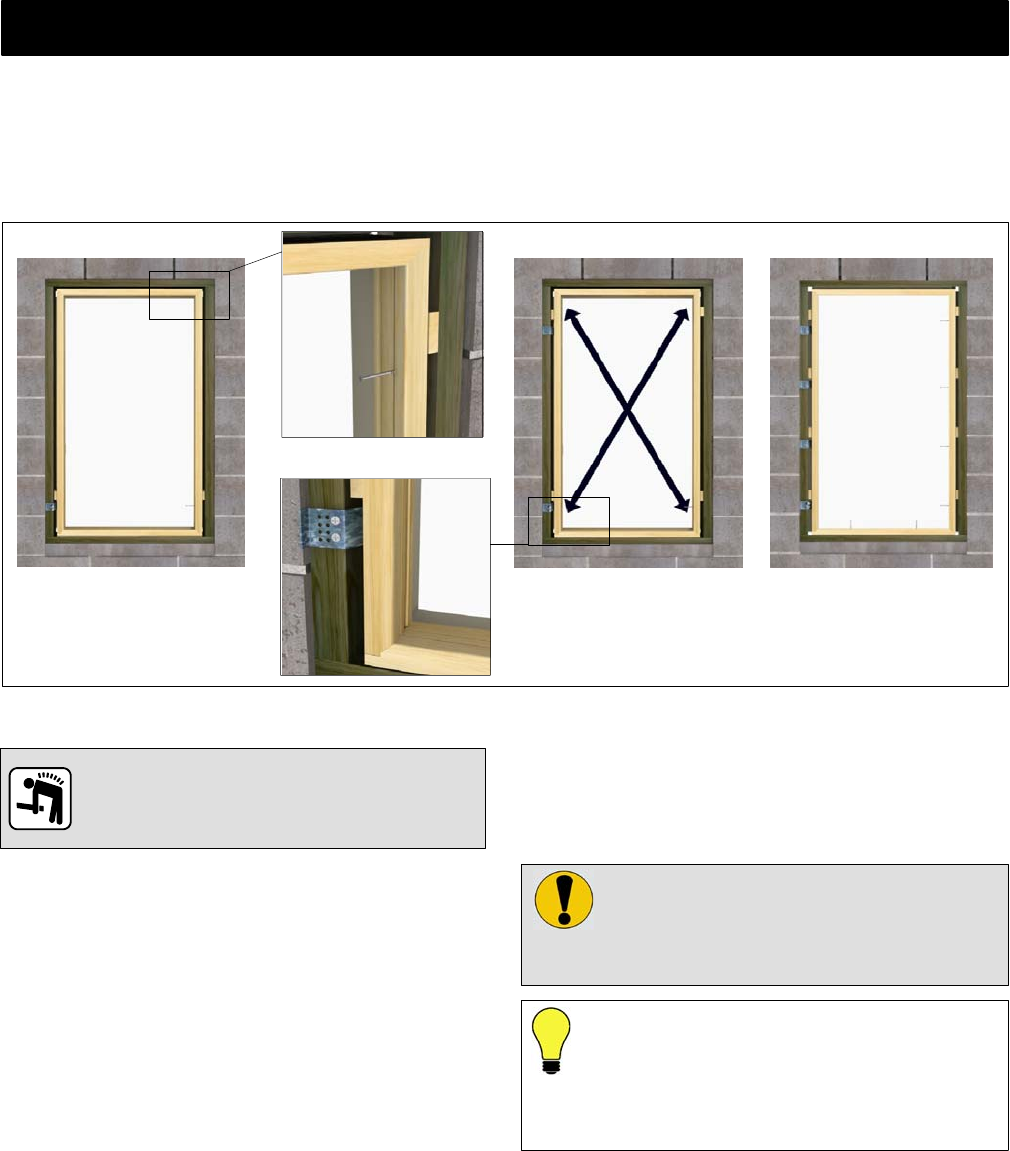
Figure 6: Plumb and square unit. (Illustration shows both masonry clip and jamb screw installation.)
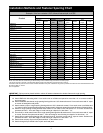
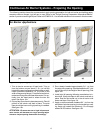
The following steps provide details for structural fastening of the window to the opening. When installing windows
with nailing fin or wood brick mould casing, it may be desirable to first attach the window using these fastening
methods in conjunction with steps 1--5. Then complete the installation by fastening with structural masonry clips,
installation brackets, or screws. Always follow fastener spacing and allowable methods outlined in the “Installation
Methods” and “Fastener Spacing Chart” sections. On applicable construction using a continuous air barrier
system, prepare the opening before installing the window. Refer to the “Continuous Air Barrier Systems” section
for details.
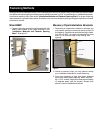
1. If rigid sill pan isnot used, pan sillwith alternate meth-
ods or shim under window sill to ensure it does not
come in direct contact with treated lumber.
2. On some larger units such as the Ultimate Double
Hung Magnum, it may be necessary to remove the
sash prior to installation. See the sash removal sec-
tion for details.
3. Center the window in the opening. Level at the sill
and plumb the frame (interior/exterior) to desired
depth.
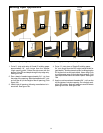
4. Fasten and shim the jambs at the bottom with the ap-
propriate fastener(follow instructions inthe “Fasten-
ing Methods” section). See figure 6a. Ultimate
Double Hung Magnum are sent with supplemental
instructions that explain how to fasten through the
jamb and head jamb.
CAUTION: Proper shimming is extremely
important. Under--shimming or over--
shimming will result in bowed jambs and
Installation Tip: On operating units, one
method to ensure that the unit is installed
square is to check the reveal (gap) between the
operating sash and the frame. An even reveal around
the entire sash generally indicates a correctly
installed unit and will ensure smooth operation.
or head jamb. Both conditions can contribute to
improper window operation and performance.
(b)
(a)
Measure
diagonally
for square
Seek Assistance: Some large windows
and/or assemblies are very heavy. Avoid
injury by getting help to lift and position the
window into the rough opening.
(c)
5. Fasten and shim about 4″ (102) from the top to square
the unit in the opening. Take diagonal measurements
of the window. When equal, the window is square in
the opening. Adjust the shims and fasteners until the
unit is square in the opening. See figure 6b.
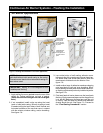
6. Complete shimming and fastening at locations and
spacing specified in the “Installation Methods and
Fastener Spacing Chart”. See figure 6c.
7. Recheck the diagonals one more time to make sure
the unit is s quare in the opening. Adjust fasteners as
necessary to bring to square.
8. Once the unit is installed square and plumb, operate
the sash (on operable units) to make sure it is operat-
ing properly. If not, you may have to make some addi-
tional adjustments to the shims and fasteners.
9. If removed, replace your stops, covers, and liners.
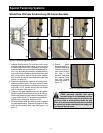
NOTE: Some units such as the Ultimate Double Hung
Magnum and IZ3 Ultimate Double Hung, feature unique
fastening systems. For these windows refer to the “Spe-
cial Fastening Systems” section for details.
7