


33
7 Start-up
Check/control water chemistry
Do not use petroleum-based cleaning or
sealing compounds in the boiler system.
Damage to elastomer seals and gaskets
in the system could occur, resulting in
substantial property damage.
Hardness less than 7 grains
1. Consult local water treatment companies for hard water
areas (above 7 grains hardness).
Chlorine concentration less than 200 ppm
1. Do not fi ll boiler or operate with water containing
chlorine in excess of 200 ppm.
2. Filling with chlorinated fresh water should be acceptable
since drinking water chlorine levels are much lower.
3. Do not use the boiler to directly heat swimming pool or
spa water.
Test/replace freeze protection fl uid
1. For systems using freeze protection fl uids, follow fl uid
manufacturer’s instructions.
2. Freeze protection fl uid must be replaced periodically due
to degradation of inhibitors over time. Follow all fl uid
manufacturer’s instructions.
Freeze protection (when used)
1. Determine freeze protection fl uid quantity using
system water content, following fl uid manufacturer’s
instructions. Boiler water content is listed on page 7.
Remember to include expansion tank water content.
2. Local codes may require a backfl ow preventer or actual
disconnect from city water supply.
3. When using freeze protection fl uid with automatic fi ll,
install a water meter to monitor water makeup. Freeze
protection fl uid may leak before the water begins to
leak, causing concentration to drop, reducing the freeze
protection level.
4. The freeze protection set points may be lowered when
freeze protection fl uid is used (see the Outdoor Knight
XL Service Manual).
Fill and test water system
1. Fill system only after ensuring the water meets the
requirements of this manual.
2. Close manual and automatic air vents and boiler drain
valve.
Eliminate all system leaks. Continual
fresh makeup water will reduce boiler life.
Minerals can build up in the heat exchanger,
reducing heat transfer, overheating the heat
exchanger, and causing heat exchanger
failure.
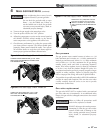
Purge air from water system
1. Purge air from system:
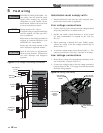
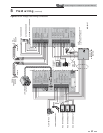
a. Connect a hose to the purge valve (see purge/drain
valves, in piping diagrams on page 22). Route the
hose to an area where water can drain and be seen.
b. Close the boiler or system isolation valve between
the purge valve and fi ll connection to the system.
c. Close zone isolation valves.
d. Open quick-fi ll valve on cold water makeup line.
e. Open purge valve.
f. One zone at a time, open the isolation valves. Allow
water to run through the zone, pushing out the air.
Run until no noticeable air fl ow is present. Close the
zone isolation valves and proceed with the next zone.
Follow this procedure until all zones are purged.
g. Close the quick-fi ll water valve and purge valve and
remove the hose. Open all isolation valves. Watch
that system pressure rises to correct cold-fi ll
pressure.
h. After the system has operated for a while, eliminate
any residual air by using the manual air vents located
throughout the system.
i. If purge valves are not installed in the system, open
the manual air vents in the system one at a time,
beginning with the lowest fl oor. Close the vent when
water squirts out. Repeat with remaining vents.
2. Open automatic air vent (diaphragm-type or bladder-
type expansion tank systems only) one turn.
3. Open other vents:
a. Starting on the lowest fl oor, open air vents one at a
time until water squirts out.
b. Repeat with remaining vents.
4. Refi ll to correct pressure.
3. Fill to correct system pressure. Correct pressure will vary
with each application.
a. The minimum cold water fi ll pressure for a
commercial system is 12 psi (82.7 kPa).
b. Pressure will rise when boiler is turned on and
system water temperature increases.
4. At initial fi ll and during boiler startup and testing, check
system thoroughly for any leaks. Repair all leaks before
proceeding further.
ƽ WARNING
ƽ CAUTION
Outdoor Knight XL Installation & Operation Manual