


- 24 -
Copyright ©2008 LG Electronics. Inc. All right reserved.
Only for training and service purposes
LGE Internal Use Only
Control Panel Key Lock
Part No: AYCP101
Description
The Key Lock kit prevents tampering of the controls used to
set temperatures and heating or cooling functions.
Receiving
Upon receipt of the product, inspect the shipping carton for
signs of visible damage. Report any damage or shortage to
the carrier and note it on the delivery receipt. Unit must be
stored in its original shipping carton in a dry, secure place
prior to its installation and use.
Installation
The installation and servicing of the equipment referred to in
this booklet should be performed by qualified, experienced
technicians.
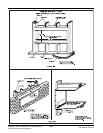
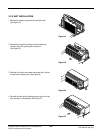
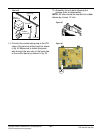
1. Remove front from unit by pulling bottom out and then
lifting upward. (Figure 28)
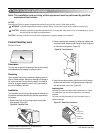
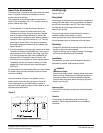
2. Remove existing door assembly by lifting door halfway and
using both hands, bow door just enough for door hinge pins
to slide out of mating holes. (Figure 29)
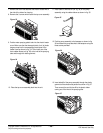
3. Install the new door assembly with the key lock by bowing
the door with both hands and aligning the door hinge pins
with their bracket in the front. (Figure 30)
Important Note:
Personal Risk Hazard Underwriter’s Laboratories Inc. listed.
For institutional use only where supervisory monitoring is
available.
Any other use may increase the risk of personal injury or
property damage.
Note: The installation and servicing of this equipment must be performed by qualified,
experienced technicians
NOTICE:
Warnings and Cautions appear at appropriate sections throughout this manual. Read these carefully.
WARNING - Indicates a potentially hazardous situation which, if not avoided, could result in death or serious injury.
CAUTION - Indicates a potentially hazardous situation which, if not avoided, may result in minor or moderate injury. It may
also be used to alert against unsafe practices.
CAUTION –Indicates a situation that may result in equipment or property-damage-only accidents.
Door
Front
Hinge Pins
(Each Side)
Brackets
(Each Side)
Figure 28 - Remove Front
Figure 29 - Door Removal
Figure 30 - New Door Installation
4. Field Installed Accessories