


f
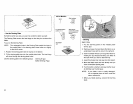
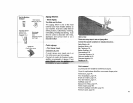
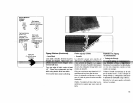
Set the Machine
R_glages
Stitch
Point
|
Stitch selector
S_lecteur de point
TYPE:
@
Top thread tension
control I to 4
Tension du fil
d' aiguille, I d 4
Stitch length control
any number (not
necessary to adjust)
Longueurdu point,
au choix(pasde
r#glageobligatoire)
LEN.,q;TH
Zigzag foot
Pied de point zigzag
Darningplate
Platine d repriser
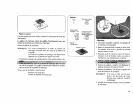
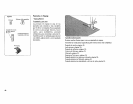
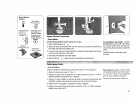
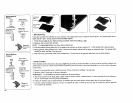
Zigzag Stitches (Continued)
• Sew_a:Button
L_k__.._.__ ___.e for_ _vir_ (-w,e p; _ ): ........................ .........=............... _:_:the eh_-nk;:_:_
l. Set the stitch selector at d _ "
2. Align both holes of the button with the slot o! the foot and place the left hole of
the button just below the needle point.
3. Lower the foot and turn the stitch selector to zigzag until the needle point comes
just above the right hole of the button.
4. Sew about five stitches and raise needle.
5. Set the stitch at d = again and sew a few stitches to lock thread.
threads leaving a 20 cm (8"') tail. Bring
the needle thread down through the
hole in the button and wind it around the
shank.
Draw the thread to the bottom side
and knot.
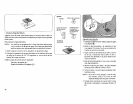
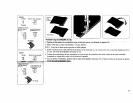
Points zigzags (Sure)
• Pose des boutons
Utilisez la platine de reprisage pour poser des boutons. (Voyez page 45 ).
i
1. R_glez le s_lecteur de point ?z << c]_ _>.
2. Alignez les deux trous du bouton avecla fente du pied et placez le trou de
gauche du bouton directement sous l'aiguille.
3. Abaissez le pied et r#glez le s_lecteur de point a la position zigzag pour que
t' aiguiUe se ddplace directement au-dessus du trou de droite du bouton.
4. Faites environ cinq piq?tres, puis faites remonter l'aiguilte.
i
5. R_glez ?t nouveau le sdlecteur de point ?t la position (_ d _ _> etfaites quelques
piq?_res pour arr_ter le ill.
Pour renforcer la tige, coupez les ills
en laissant fi chacun une section de 8
po. (20 cm). Glissez le fil d'aiguille
dans un trou et entourez la queue.
Passez le fil sous le tissu et nouez-le.
51