


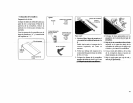
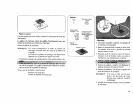

8. Open the zipper.
9. Lower the presser foot and stitch the
rest of the seam.
(
it side
I
L tissu
10, Close the zipper and turn the fabric
right side up.
f
I
I
I
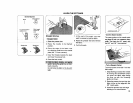
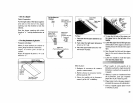
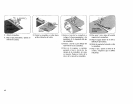
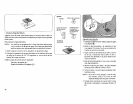
11. To sew the right side of the zipper,
set the zipper foot on the right side of
the needle.
12. Stitch across and below the bottom
of the zipper.
13.Turn the corner and continue to
guide the foot along the zipper teeth,
as shown.
Stitch through the fabric and zipper
tape.
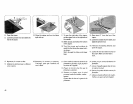
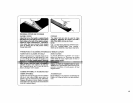
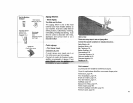
14. Stop about 2" from the top of the
zipper.
15. Lower the needle into the fabric and
raise the presser loot.
16. Remove the basting stitches and
open the zipper.
17. Lower the foot and stitch the rest of
the seam. Make sure the fold is
even.
8. Repoussez le curseur en bas.
9. Abaissez le pied presseur et finissez
votre coutute.
10. Remontez le curseur et retournez
l' ouvrage, pour que l'endroit soit
vers le haut.
11. Pour coudre la ruban de droite de la
fermeture a glissiOre, rdgtez te pied a
la droite de l'aiguille.
12. Piquez en travers plus basque la
fermeture a glissiOre.
13. Tournez et piquez avec le pied
presseur centre les mailles, comme
reentrY.
Piquez clans le fissu et la ganse de la
fermerure.
14. Arrdtez a 219o. environ du haut de la
fermeture.
15. Laissez l'aiguille piqude dans le fissu
et soulevez te pied.
16. Enlevez les points de b:zti et ouvrez la
fermeture.
17. Abaissez le pied etfinissez de coudre.
Veillez ace que le pli soit rdgulier.
4O