


• Sew in a Zipper
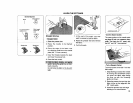
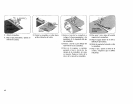
Fabric Preparation:
Put the right sides of the fabric together
and sew to the end of the zipper
opening. Use the reverse to lock the
stitches.
Sew the zipper opening with stitch
length at -4 "°and top thread tension at
"'3 "'.
• Pose ks_metares _ g_ss_re
Preparez votre tissu:
Mettez le tissu endroit sur endroit et
cousez jusqu 'au bout de l'ouverture.
Piquez en arri_re pour arr_ter la
couture.
R_glez la longueur du point a "4" et la
tension a "3".
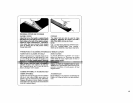
Ri
of fabric
Endroit
du tissu
Top edge of fabric
Bord sup_rieur
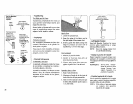
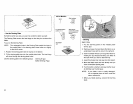
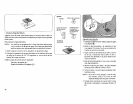
Set the Machine
R_glages
Stitch selector
Stitch S_lecteurde point
Point TYPE
, @
I
i
Top thread tension Stitch length
control 3 to 6
control 2
Zipper foot
Pied de Jermetures _tglissi_re
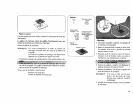
Zipper teeth
(118"') Mailles
Zipper tape
Ganse
J
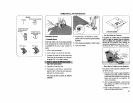
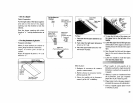
To Sew :
1. Fold back the left seam allowance as
shown.
2. Turn under the right seam allowance
to form a 1/8" fold.
3. Place the zipper teeth next to the 1/8-
fold and pin in place.
Mise en place:
1. Rabattez ta ressource de couture
gauche, comme montrd.
2. Repliez dessous la ressource droite,
formez un pli de 1/8".
3. Placez les mailles de la fermeture
contre le pli de 1/8" et b_issez.
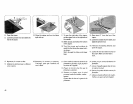
4. To sew the left side of the zipper, set
tt_ z_ foot on the I____ of the
needle.
5. Lower the zipper foot on the right side
at the bottom of the zipper so that the
needle pierces the fold and the zipper
tape.
8. Sew through the fold and the zipper
tape to the point where the slider
begins.
7. Lower the needle to hold the fabric
and raise the presser foot,
4.Pour coudre le coM gauche de la
fermemre a glissidre, rdglez te pied de
fermetures a glissi_re it la gauche de
l'aiguille.
5. Abaissez le pied sur l' endroit au bout
de la fermeture, pour que !"aiguilte
pique dans le pli et dans la ganse.
6. Piquez dans le pli et.la ganse, jusqu'a
proximiM du curseur de la fermeture.
7 Laissez l'aiguille piqude dans le fissu
et remontez le pied.
39