


20
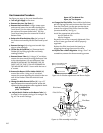
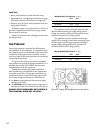
Install the Log Set
The Lillehammer is equipped with a one piece log
set and is packaged in bubble wrap inside the
firebox. The log set must be removed from the
packaging and arranged in the unit prior to start up
of the gas stove. Do not handle the log set with
your bare hands. Always wear gloves to prevent
skin irritation from the ceramic fibers.
To install the log set, remove the packaging and
place the log set inside the firebox, centered from
left to right and completely against the rear wall of
the stove. See Figure 23.
A package of Glow Embers is included with the
Log Set. These are to be placed across the burner
tube on the screen. It is best to equally space these
embers for optimum flame appearance. Note: All of
the embers do not have to be used.
Use work gloves to handle the ceramic logs and
and Glow Embers. These parts can irritate skin. If
contact and irritation occurs, gently wash your hand
with a mild soap and warm water.
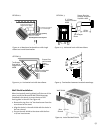
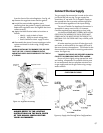
Air Shutter Adjustment / Flame Picture
The Lillehammer is shipped from the factory
equipped to use NATURAL GAS. When converted for
use with propane gas, the air shutter on the burner
tube must be adjusted to achieve the proper gas to
air mix.
Air Shutter Settings: See Figure 22.
1/8” open for Natural Gas
3/4” open for Propane
The air shutter can also help achieve the desired
flame appearance. Generally, flame appearance is a
matter of preference, however most consumers
enjoy the warm yellowish flame.
Too large a setting - the appliance will generate
a flame that is blue and transparent, or an “anemic”
flame.
Too small a setting - the appliance will generate
very long yellow flames resulting in soot. Sooting
produces black deposits on the logs, on the inside
walls of the appliance, and potentially on the
exterior termination cap.
Sooting is caused by incomplete combustion in
the flames and lack of combustion air entering the
air shutter opening.
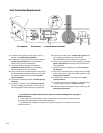
To adjust the air shutter, remove the burner
tube and using a phillips head screwdriver loosen
the screw at the air shutter and adjust accordingly.
Be sure to retighten the screw that holds the air
shutter setting. Reassemble the stove and close the
door, allow stove to burn 30 minutes on the HIGH
setting, observing the flame continuously. If the
flame appears weak, slow, or sooty, repeat the process
described above until the flame is as desired.
Recommended Air Shutter Settings:
Natural Gas - 1/8” open
Propane - 3/4” open
WARNING:
AIR SHUTTER ADJUSTMENTS SHOULD
ONLY BE PERFORMED BY A
QUALIFIED PROFESSIONAL SERVICE
TECHNICIAN.
Figure 23. Seat log set against rear wall.
NOTE: Air shutter should never be
LESS than 1/8” open.
Air Shutter
Figure 22. Air shutter opening.
Burner Tube
Locking
Screw
Embers