


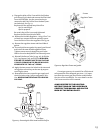
Fuel Conversion
The Allagash gas stove is shipped from the factory
equipped as a NATURAL GAS unit; However, the stove
is shipped with the necessary gas conversion kit to
convert the stove to burn propane gas. The kit
contains all the necessary components needed to
complete the conversion and ensure safe operation,
including Conversion Notice labels that must be
affixed to the stove and stove Rating Plate.
WARNING:
THE CONVERSION KIT IS TO BE INSTALLED
BY AN AUTHORIZED JØTUL SERVICE TECH-
NICIAN IN ACCORDANCE WITH THE
MANUFACTURERS INSTRUCTION AND ALL
CODES AND REQUIREMENTS OF THE AU-
THORITY HAVING JURISDICTION. FAILURE
TO FOLLOW THESE INSTRUCTIONS COULD
RESULT IN SERIOUS INJURY OR PROPERTY
DAMAGE. THE QUALIFIED AGENCY PER-
FORMING THIS WORK ASSUMES RESPONSI-
BILITY FOR THIS CONVERSION.
IN CANADA: THE CONVERSION SHALL BE CARRIED
OUT IN ACCORDANCE WITH THE REQUIREMENTS OF
THE PROVINCIAL AUTHORITIES HAVING JURISDIC-
TION AND IN ACCORDANCE WITH THE REQUIRE-
MENTS OF THE CAN1-B149.1 AND .2 INSTALLATION
CODE.
Gas Conversion Procedure
1. Turn off gas supply to the stove.
2. Open the front doors.
3. Remove the stove top plate.
4. Release the glass clips atop the stove and
slowly lift glass panel up and off of the firebox.
5. Carefully remove the logs and set out of the way.
6. Remove burner tube: Lift out the log support plate.
Using a ¼ nut driver remove the two screws secur-
ing the burner tube (17, pg. 22) to the stove bottom.
Lift out the burner tube.
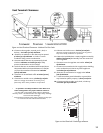
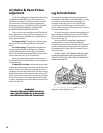
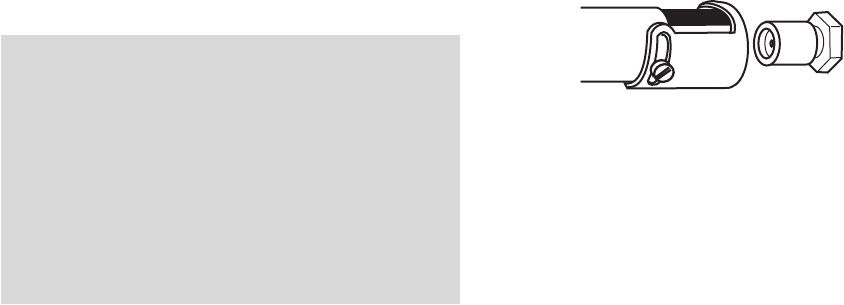
7. Change the main burner orifice (32, pg 22 and Fig.
12). Using a ½ open end wrench, remove the
burner orifice and replace with the appropriate
orifice, supplied in the kit.
Natural gas - #38
Propane - 1.5 mm DMS
8. Adjust the air shutter on the burner tube to allow
for the proper mixing of air and gas. See Fig. 12.
Natural - Three-quarters OPEN.
Propane - FULL OPEN
Tools required:
1/4 Nut driver 7/16 open end wrench
1/2 open end wrench Torx T-20 or slot head
screwdriver.
Kit Contents:
1, Regulator Tower labeled for propane
3, Regulator Tower screws
1, Burner Orifice (1.5 mm for LPG, #38 for NG)
1, Pilot Orifice ( #30 for LPG, #51 for NG)
1, 4 mm Hex Key
Label A - to be completed and applied to the back of
the stove.
Label B - apply to the stove Rating Plate.
IMPORTANT: SHUT OFF THE GAS
SUPPLY AT THE MAIN SUPPLY VALVE
BEFORE BEGINNING THE
CONVERSION.
If a blower is installed, be sure to
disconnect the power cord before
proceeding with this conversion.
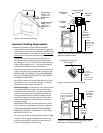
Figure 12. Burner Orifice and Air Shutter. Shutter is
shown in the fully open position.
NOTE: The Air Shutter should never be set LESS
than 1/8 open.
Burner Tube
Air
Shutter
Burner Orifice
12