


– 3 –
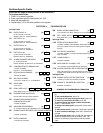
Recommended Programming Procedure
The following is a step-by-step procedure recommended for programming your VISTA-40 system.
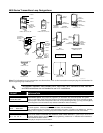
1. Set the keypads (and other peripheral devices) to the appropriate addresses.
2. Set factory defaults by pressing
✱97.
This will automatically enable keypad addresses 00-01, so be sure at least one keypad is set to one of these
addresses.
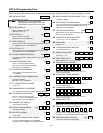
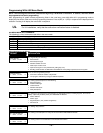
3. Program system-wide (global) data fields.
Using the programming form as a guide, enter program mode and program all system-wide programming
fields. These options affect the entire system, regardless of partitions. They include control options,
downloader and dialer options, RF options, event logging options, etc. Refer to the Program Field Index for a
listing of the program fields and their function.
Note that field 2
✱00 (number of partitions) must be programmed before continuing.
4. Program partition-specific fields.
When the system-wide fields have been programmed, program all partition-specific programming fields by
first pressing
✱91 to select a partition (while still in data field program mode). Then enter the first partition-
specific field number
✱09. When you are finished, the next partition-specific field is automatically displayed.
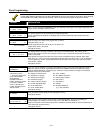
Partition-specific fields can have different values for each partition. To program the fields for the next partition,
press
✱91, enter the desired partition number, then enter field ✱09. Refer to the MECHANICS OF
PROGRAMMING section in the ADEMCO VISTA-40 Installation and Setup Guide for detailed instructions.
5. Use #93 Menu Mode for device programming.
Refer to Device Programming in this guide to assign keypad ID numbers and default partitions for each
keypad, and to selectively suppress certain keypad sounding options. Also use this mode to assign RF
receivers, relay modules, and the VIP module.
6. Use #93 Menu Mode for zone programming.
Refer to Zone Programming in this guide to program zone response types, assign right loop zones and
wireless zones, assign zones to partitions, and to program alarm report codes.
7. Use #93 Menu Mode for programming relays.
Refer to Relay Programming in this guide to program desired relay operation.
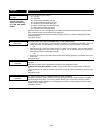
8. Program Communication options.
Refer to System Communication section in the ADEMCO VISTA-40 Installation and Setup Guide for detailed
instructions. Then use #93 menu mode to program report codes.
9. Use #93 Menu Mode for programming alpha descriptors.
Refer to Alpha Programming in this guide to enter zone and partition descriptors and a custom installer’s
message.
10. Use #93 Menu Mode for relay voice descriptors and custom word substitutes.
Refer to Relay Voice Descriptors in this guide for further instructions for programming relay descriptors to be
annunciated by the VIP module, as well as the Custom Index section for custom word substitutes.
11. Define user access codes.
Refer to User Access Codes in the ADEMCO VISTA-40 Installation and Setup Guide to program authority
level, O/C reporting option, partition assignments, and RF key assignments for each user.
12. Exit Programming Mode.
Exit programming mode by pressing either
✱98 or ✱99. Additional entries of ✱99 are required if the exit is
being done from fields 1
✱00 and above.
To prevent re-access to programming mode using the Installer’s code, use
✱98. The only way to re-access
programming mode is by depressing both the [
✱] and [#] keys at the same time within 30 seconds of power-
up.
Exiting by using
✱99 always allows reentry into programming mode using the Installer code. Either way of
exiting allows access via downloading. Note that if local programming lockout is set via downloading,
programming mode cannot be entered at the keypad.