


15 D04-991-2400 5/1/04
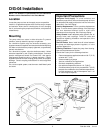
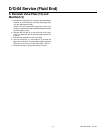
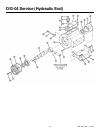
D/G-04 Service (Hydraulic End)
NOTE: The numbers in parentheses are the Ref. Nos. on
the illustrations in the Parts Manual.
This section explains how to disassemble and inspect the
hydraulic end (oil reservoir) of the pump.
CAUTION: Do not disassemble the hydraulic end unless
you are a skilled mechanic. For assistance, contact Wanner
Engineering (TEL 612-332-5681 or FAX 612-332-6937) or the
distributor in your area.
Depending on the repair you are attempting, you may or may
not have to remove the motor from a direct-drive pump/motor
unit.
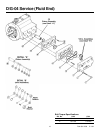
Internal piston components (21-27) can be serviced without
removing the motor or crankshaft. The motor and crankshaft
must be removed to service the connecting rod (59), piston
housing (20), crankshaft (57), front bearing (68), back bearing
(56), or seal (54).
Tools and Supplies
• Tools required for hydraulic end only:
• Snap-ring pliers
• Small hook
• 8-mm socket wrench
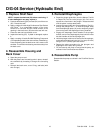
To Service Pistons Without
Removing Motor or Crankshaft
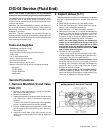
1. Disassemble Pistons
With the manifold, valve plate, diaphragm plate, and
diaphragms removed, and the oil drained from the pump
(see the Fluid-End Service Section):
a. Remove the snap ring (27) from one of the pistons, using
a standard snap-ring pliers.
b. Pull out the valve plunger (24). This also removes the
washer (26) and spring (25).
c. Insert a small hook through the center hole of the valve
cylinder (22), and pull the cylinder out of the piston. Be
careful not to damage the piston.
d. Inspect all parts, and replace the O-ring and any other
parts that are worn or may be damaged.
e. Repeat steps “a” through “d” for the remaining pistons.
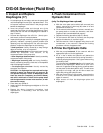
2. Reassemble Pistons
a. Tip the pump so the pistons are vertical.
b. Drop a ball (21) into the opening in the bottom of the
piston.
c. Insert the valve plunger (24) into a valve cylinder (22).
Slide a spring (25) over the plunger, inside the valve
cylinder.
d. Slide the assembled valve cylinder, plunger, and spring
(22-25) into the piston (20).
e. Insert the washer (26) over the plunger.
f. Using the snap-ring pliers, insert a snap ring (27) into
the piston.
g. Repeat the above procedure for the other two pistons.
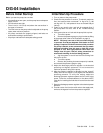
To Service Remainder of
Hydraulic End
1. Remove Pump Housing
a. Remove the manifold, valve plate, diaphragm plate, and
diaphragms, as outlined in the Fluid-End Service Section.
b. Drain the oil from the pump housing by removing the
drain plug (60).
c. Stand the pump on end, with the drive shaft up.
d. Remove the bolts (50) that secure the back cover (52)
to the housing (78). Use an 8-mm socket wrench. Save
the O-rings (51).
e. Remove the cover and the cover O-ring (53).
f. Remove the crankshaft (57) by pulling it through the
connecting rods (59).
2. Remove and Replace Pistons
To remove the pistons (20), first remove the connecting rod
(59) and pin (58) by pressing the pin through the connecting
rod.
Reverse the process to reinstall the piston.
Refer to Steps 5 and 6 below to replace the diaphragm and
reassemble the pump.