


12 D04-991-2400 5/1/04
D/G-04 Service (Fluid End)
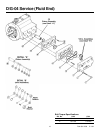
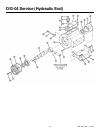
3. Inspect and Replace
Diaphragms (17)
a. Lift a diaphragm by one edge, and turn the pump shaft
until the diaphragm moves up to “top dead center”. This
will expose machined cross-holes in the plunger shaft
behind the diaphragm.
b. Insert the plunger holder tool through one of the
machined cross-holes, to hold the diaphragm up. (Don’t
remove the tool until the new diaphragm is installed in
step “f” below.)
c. Unscrew the diaphragm. Use a 5/16-in. (8-mm) open-
end wrench, and turn counterclockwise.
d. Inspect the diaphragm carefully. A damaged diaphragm
generally indicates a pumping system problem and
replacing only the diaphragm will not solve the larger
problem. Inspect the diaphragm for the following:
• Small puncture. Usually caused by a sharp foreign
object in the fluid, or by an ice particle.
• Diaphragm pulled away from the metal insert. Usually
caused by excessive inlet vacuum, or by
overpressurization of the pump inlet.
• Outer diaphragm bead extruded. Usually caused by
overpressurization of the pump.
• Diaphragm becoming stiff and losing flexibility.
Usually caused by pumping a fluid that is incompatible
with the diaphragm material.
• Cut diaphragm convolute. Usually caused by
excessive inlet vacuum.
CAUTION: If a diaphragm has ruptured and foreign
material or water has entered the oil reservoir, do
not operate the pump. Check all diaphragms, then
flush the reservoir completely (as outlined below)
and refill it with fresh oil. Never let the pump stand
with foreign material or water in the reservoir, or with
the reservoir empty.
e. Clean away any spilled oil.
f. Install a good or new diaphragm and tighten to 10 in.-lbs
(110 N-cm).
g. Repeat the above inspection procedure (and
replacement, if necessary) with the other two
diaphragms.
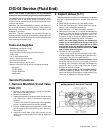
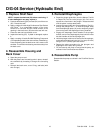
4. Flush Contaminant from
Hydraulic End
(only if a diaphragm has ruptured)
a. With the valve plate and manifold still removed (see
above), remove the oil drain cap (60) allow all oil and
contaminant to drain out.
b. Fill the reservoir with kerosene or solvent, manually turn
the pump shaft to circulate the kerosene, and drain.
Dispose of this contaminated fluid properly.
c. Repeat the flushing procedure (step “b” above).
d. Fill the reservoir with fresh oil, manually turn the pump
shaft to circulate the oil, and drain again.
e. Refill the reservoir. If the oil appears milky, there is still
contaminant in the reservoir. Repeat the flushing
procedure until the oil appears clean.
5. Prime the Hydraulic Cells
a. With the pump horizontal, fill the reservoir with the
appropriate Hydra-oil for the application.
b. All air in the oil within the hydraulic cell (behind the
diaphragms) must be forced out by turning the shaft —
and thus pumping the piston. Use a glove when turning
the shaft by hand.
Turn the shaft until a bubble-free flow of oil comes from
behind all the diaphragms. Watch the oil level in the
reservoir: if it gets too low during priming, air will be drawn
into the piston (inside the hydraulic end). This will cause
the pump to run rough, and you will have to start over
again with priming the hydraulic cells.
c. After the Hydra-Cells are fully primed, ensure that the
oil level is 1/4 in. (6 mm) above the cast surface in the
upper oil reservoir.
d. Wipe excess oil from the diaphragm plate and
diaphragms.