


43Heat & Glo • Supreme-N-I30AU, Supreme-P-I30AU • 2222-900 Rev. P • 6/12
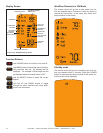
AboutONMode
• All functions can be accessed when the remote control
is in the ON mode.
• Only active functions will be displayed when the remote
control is in the ON mode. For example: if the fan is the
only function that’s active, the fan icon and ame will be
the only icon shown in the display.
AboutOFFMode
Only the following functions can be accessed in the OFF
mode:
• AUX1
• AUX2
Only active functions will be displayed when the remote
control is in the OFF mode.
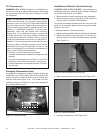
TurningONtheFireplace
• Press the POWER button to turn the replace ON. The
replace will rst ignite the pilot. Once the pilot ame is
estabilshed the main burner will be lit.
NOTICE: Whenever the replace is cycled from OFF to
ON, the main burner will light on high for 10 seconds be-
fore returning to the previous user setting.
AdjustingFlameHeight
• Press the MENU button to activate the menu.
• Using the UP and DOWN arrows highlight the FLAME
icon and press SELECT.
• Use the UP and DOWN arrows to adjust the FLAME
HEIGHT, then press SELECT. The FLAME HEIGHT
can be adjusted to 5 different settings.
NOTICE: FLAME HEIGHT will not be adjustable for rst
ten seconds when replace is turned on.
NOTICE: The system will remember the previous FLAME
HEIGHT setting and will automatically adjust after 10
seconds.
AdjustingFanSpeed
• Press the MENU button to activate the menu.
• Using the UP and DOWN arrows highlight the FAN icon
and press SELECT.
• Use the UP and DOWN arrows to adjust the FAN SPEED,
then press SELECT. The FAN SPEED can be adjusted
to 3 different settings: HIGH, MEDIUM, LOW.
NOTICE: The fan has a timer built into the control module.
After the replace is turned ON the timer will wait for 3
minutes before turning on the fan. In addition, the fan
will remain on for 12 minutes after the replace has been
turned OFF.
NOTICE: Whenever the fan is turned ON, the FAN will start
up on the high setting for 10 seconds before adjusting to
the previous user setting.
AUX1Function(UnitdependentFunction)
• Press the MENU button to activate the menu.
• Using the UP and DOWN arrows highlight the AUX1 icon
and press SELECT.
• Use the UP and DOWN arrows to adjust the AUX1output,
then press SELECT. The AUX1function can be adjusted
to 4 different settings: HI, MED, LOW and OFF.
AUX2Function(UnitdependentFunction)
• Press the MENU button to activate the menu.
• Using the UP and DOWN arrows highlight the AUX2 icon
and press SELECT.
• Use the UP and DOWN arrows to turn the AUX2 ON or
OFF, then press SELECT. The AUX2function can be
either be turned ON or OFF.
NOTICE: The system will remember the previous AUX1
and AUX2 setting from the menu. However, when the re-
place is turned OFF both AUX1 and AUX2 will be turned
off. AUX and AUX2 can be activated when the ame is off
from the remote’s OFF mode. When the replace is turned
back ON the AUX1 and AUX2 settings will be restored to
the previous ON setting.