


36
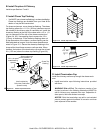
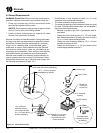
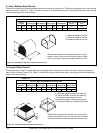
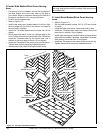
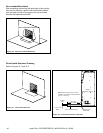
Figure 11.2 Herringbone Molded Brick Panel
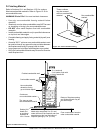
Note: Use T-brackets as templates and drill pilot holes into
the inner shell with the drill bit provided. Side panels must
be installed fi rst.
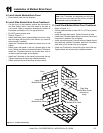
E. Install Back Molded Brick Panel-Herring-
bone
• Refer to Figure 11.2.
• Set the grate brackets in place, 26.5 in. (673 mm) center
to center.
• Install the lower back panel. Center from side to side.
• Install two T-brackets stem down into mortar line to hold
lower back in position. Do not tighten.
• Install upper back panel. Position bottom of panel behind
the previously installed T-brackets. Install three T-brackets
stem side up into mortar line, do not tighten
• Install two Z-brackets in the mortar joints across the top.
Tighten these and all previously installed brackets.
D. Install Side Molded Brick Panel-Herring-
bone
• If a gas line is to be installed, remove the knockouts in
the inner fi rebox and in the outer shell on the side of
your choice. Refer to dimension drawings for location of
knockouts and Section 13.A. for gas provisions.
• Do NOT remove screen rods.
• Refer to Figure 11.2.
• Install lower side panel, tapered edge to the front. Align
the front edge with the front of the column (or butted to
the surround if installed).
• Install two T-brackets stem down into mortar line, do not
tighten.
• Install upper side panel in the unit, tapered edge to the
front. Position the bottom of panel behind the T-brackets.
Install two T-brackets stem up into mortar lines, one Y-
bracket on the front edge as shown. Do not tighten.
• Install two Z-brackets in the mortar joints across the top.
Tighten these and all previously installed brackets.
• Install second side panel following the steps above.
Hearth Molded Brick Panel
Lower Side
Molded Brick Panel
Upper Side
Molded Brick Panel
Front
Lower Back
Molded Brick Panel
Grate Brackets
Upper Back
Molded Brick Panel
Heat & Glo • RUTHERFORD-50 • 4059-333 Rev C • 06/08