


31
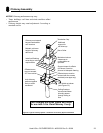
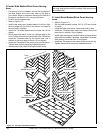
1/2 in. air space
established by
spacers
Chase Top
Flashing
1/2 in.
Air Space
(Not furnished by
Dura-Vent) Fabricated
Spaces Locally
1/2
Storm collar must
be installed 1 in.
off chase top
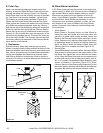
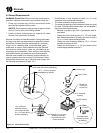
Figure 9.4 Chase Top Construction
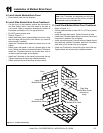
B. Install Fireplace & Chimney
Install as per Sections 7 and 8.
C. Install Chase Top Flashing
• You MUST use a chase top fl ashing in a chase installation.
Chase top fl ashings are available from your Heat & Glo
dealer or may be fi eld constructed.
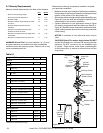
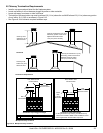
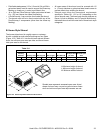
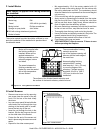
1 1/2
Figure 9.5 Chase Top Construction
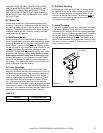
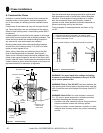
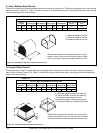
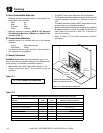
6 in. Min.
Figure 9.6 Chase Top Construction
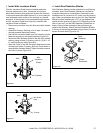
D. Install Termination Cap
Install the chimney sections up through the chase enclo-
sure.
• Install termination caps following instructions provided
with them.
For chase enclosures, use a chase top fl ashing. The chase
top fl ashing allows for a 1 1/2 in. (38 mm) clearance around
the outside of the chimney pipe for ventilation air. Install the
chase top fl ashing at the top of the chase with a 1/2 in. (13
mm) air clearance off the top of the chase constructions
(Figure 9.4, 9.5). Use spacing clips to ensure the 1/2 in.
(13 mm) air clearance. If the chase top fl ashing does not
fi t the dimensions of the chase, a custom fl ashing can be
fi eld-fabricated as long as it has the same dimensions as
noted in Figure 10.1. Secure the chase top fl ashing to the
chase with at least three screws or nails per side. When
installed, the bottom of the termination cap must be at least
6 in. (152 mm) above the chase top fl ashing (Figure 9.6).
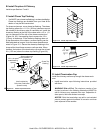
WARNING! Risk of Fire! The minimum overlap of cap
to pipe (as shown in the following illustrations) MUST be
met or chimney may separate from cap. Separation al-
lows sparks, heat and embers to escape.
NOTICE: Paint the termination cap with a rust-resistant
paint to protect against the effects of corrosion on those
parts exposed to the weather.
Heat & Glo • RUTHERFORD-50 • 4059-333 Rev C • 06/08
¨