


28
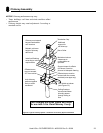
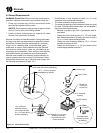
K. Finish Top
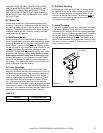
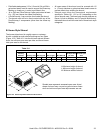
Apply a non-hardening waterproof sealant around the
chimney at the point where the Storm Collar will meet the
chimney just above the fl ashing (Figure 8.14). Slide the
Storm Collar down over the chimney to the top of the fl ash-
ing. The Storm Collar must be installed 1” off the Chase
Top Flashing to provide proper ventilation (Figure 8.14).
Tighten the bolts of the Storm Collar and seal the Storm
Collar against the Chimney with sealant. Be sure Chimney
and Offsets are properly supported. Attach the Chimney
Cap onto the top of the chimney by setting the female end
of the Cap onto the male end of the last Chimney Section.
Secure the Cap by using (4) sheet metal screws provided
Figure 8.15.) Do not push down from the top portion of the
cap as this may damage the cap. Push from the lower sec-
tion of the Cap if needed. The Chimney Cap can removed
for chimney cleaning as described in the Chimney Mainte-
nance section of this manual.
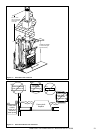
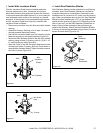
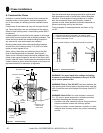
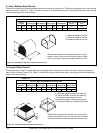
Elbow Strap
30° or 15°
Elbow
Figure 8.16
Termination
Cap
Figure 8.15
Collar
Sealant
1 in. min.
Figure 8.14
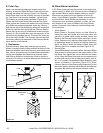
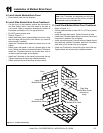
Elbow Strap
1 per
Section
Figure 8.17
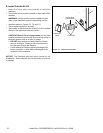
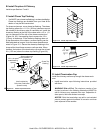
L. Enclosures
Enclose chimneys where they pass through occupied
spaces, including closets. Always maintain at least a 2-inch
clearance between the chimney and any combustible mate-
rials. Interior enclosures may be constructed with standard
framing and sheathed with sheetrock or plywood. Use a
Wall Strap or Stabilizer at least every 8 feet to maintain a
minimum of 2 inches of air space between the chimney and
combustible materials.
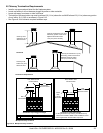
M. Offset Elbow Installation
A 30° Elbow (measured from the vertical) is the largest that
can be used in an offset. A 30° Elbow may not be combined
with another Elbow to make a steeper offset (e.g. two 30°
Elbows are not allowed to be put together to form a 60°
elbow.). Avoid Elbows if possible. A totally vertical chimney
is more effi cient. When Elbows are necessary to avoid
obstructions such as rafters, ridgepoles, or joists, you are
only allowed to use 1 pair of Elbows in any one chimney
system. Horizontal runs of chimney violate building code
are not allowed.
• Attach Elbows
Attach Elbow to Chimney Section or other Elbow by
mating the male and female ends with each other and
using the (4) sheet metal screws provided. Attach one
Elbow to the Chimney Section below, and align it for the
offset. Determine the required offset length and attach
an appropriate length (or lengths) of Chimney Section(s)
above the Elbow. Attach the second Elbow above the
Chimney Section to complete the offset (Figure 8.16).
• Secure Offset
Use an Elbow Strap to secure the offset. Secure the Elbow
Strap’s band to chimney around the upper portion of the
top Elbow, then tighten the nut and bolt until the clamp
is fi rm. Wrap the Elbow Strap end over an adjacent joist
or rafter and secure it with at least two 8-penny nails or
#8, 1-1/2” screws. Add additional Elbow Straps for each
section of chimney in the offset (Figure 8.17). Every
Chimney Section in the offset must be supported. Do not
add more Chimney Sections until the Elbows and offset are
supported. Be sure that the chimney remains vertical.
Heat & Glo • RUTHERFORD-50 • 4059-333 Rev C • 06/08