


Heat & Glo • 6000G, 6000G-IPI • 2103-900 Rev. O • 12/08 45
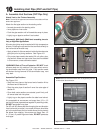
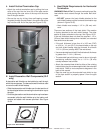
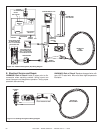
I. Install RF4-8
The RF4-8 may be used in place of the roof fl ashing and
storm collar (Sections 10.G. and 10.H.)
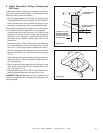
Pipe must be supported within 12 inches of the roofline
using plumbers strapping or an SLP-FS when using
the RF4-8 Flashing. Refer to Section 10.D. Secure
Vent Sections.
SLP-FS
SECURE WITH 4
SCREWS NO LONGER
THAN 1 IN. (25 MM)
APPLY SEALANT
TOP & PARTIAL SIDES
SHINGLES TRIMMED
SHINGLES OVER
FLASHING
FLASHING OVER
SHINGLES
SILICONE SEALANT
(TOP OF BOOT)
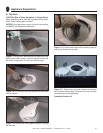
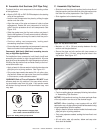
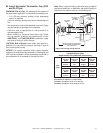
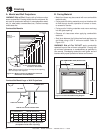
• Trim the rubber boot (using scissors or a utility knife),
cutting along the marked measurement lines. See Figure
10.19. Use the 150 mm line for SLP, 210 mm for DVP.
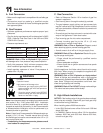
• Lubricate pipe or fl ue with water and slide the fl ashing
down. It may be necessary to trim the top shingles around
the base of the rubber boot to ensure a good fi t.
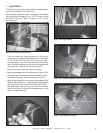
• Draw a line around fl ashing. Remove fl ashing.
• Apply silicone sealant to roof inside the lines (Figure 10.20).
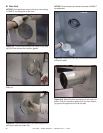
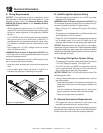
• Lubricate pipe or fl ue with water and slide fl ashing down.
Seat fi rmly in sealant. Nail roof fl ashing to the roof.
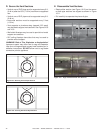
• Apply silicone sealant on the top and sides edges of the
fl ashing. See Figure 10.21. Install shingles. Apply sealant
at the top edge of the rubber boot. See Figure 10.22.
• We recommend that you top coat with conventional
acrylic house paint to improve the appearance of your
galvanized base fl ashing.
Figure 10.18 Secure Pipe with SLP-FS
Figure 10.19 Trim Rubber Boot
Figure 10.21 Slide Flashing Down, Secure & Apply Sealant
Figure 10.22 Installation Complete
Figure 10.20 Apply Sealant