


Page 9For technical questions, please call 1-800-444-3353.SKU 3914
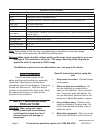
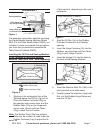
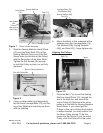
Figure 7
Hand Wheel
(7b)
Sewing Machine
Set Screws
(8b)
(One on
each side of
the Pulley)
Belt (71j)
Slot in Tabletop for belt
Main Shaft
(32b)
Bobbin Winder Assembly
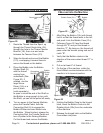
3. Slide the Sewing Machine Hand Wheel
(7b) onto the Main Shaft (32b) of the
Sewing Machine. Align one of the Set
Screw holes (on the side of the Pulley)
with the at section of the Main Shaft.
Tighten the Set Screws (8b) enough
to hold the Pulley in place, but not fully
tightened.
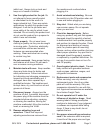
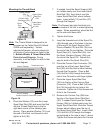
Figure 8
Carriage Bolts (70j)
ush with Tabletop
Back of Tabletop
Back of Sewing Machine
Slot with Pulley Belt
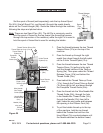
4. Using a rubber mallet (sold separately)
tap the three Carriage Bolts (70j) into the
top of the Tabletop so that they are ush
with the tabletop.
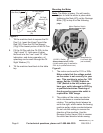
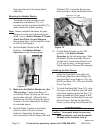
Carriage Bolts (70j),
Flat Washer (69j),
Spring Washer (68j),
Nut (67j)
Figure 9
5. Mount the Motor to the underside of the
tabletop using the Carriage Bolts (70j),
Flat Washers (69j), Spring Washers
(68j), and Nuts (67j). Finger tighten only.
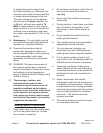
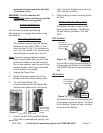
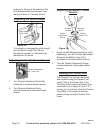
Aligning the Pulleys
Figure 10
Set Screw (7j)
Pulley (8j)
Motor
Belt (71j)
1. Place the Belt (71j) around the Sewing
Machine Hand Wheel (7b), through the
slot in the table top, and around the
motor Pulley (8j). Make sure the motor
pulley is in line with the Sewing Machine
Hand Wheel. If you cannot get the
Pulleys to line up by sliding them slightly
in either direction, you may need to turn
the Motor Pulley around. To do this,
loosen the Set Screw (7j) on the motor
Pulley, slide the Pulley off of the motor
REV 04c; 07g, 10b