


Page 13For technical questions, please call 1-800-444-3353.SKU 3914
moderate to slow speeds for the rst
15 minutes of use.
WARNING: Shut the machine off
completely before working around the
needle or other moving parts.
BASIC SETTINGS
You will need to make the following
adjustments on a regular basis when using
the machine.
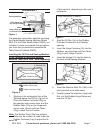
Attaching the Needle
The needles supplied with the Sewing
Machine are size 90/14 (DBX1). The
shank is size 16 x 257. For leatherwork
use a 16 x 95 needle. This machine can
accommodate a needle up to size 22.
Note: Industrial sewing machine needles
have a round shank (the top part of the
needle that slides up into the machine).
Do not use needles, such as most home
sewing needles, which have a at area
on the shank of the needle.
Unplug the Power Cord.1.
Select the proper needle size for the 2.
thread count and material being sewn.
Turn the Hand Wheel (7b) 3.
counterclockwise until the Needle Bar
reaches the highest point of its stroke.
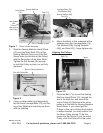
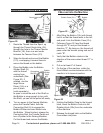
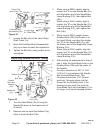
Side ViewFront View
Figure 17
Face indented
section to right
when inserting
needle
Loosen Bolt (25c)
Shank
4. Loosen the Bolt (25c) and hold Needle
(23c) with its indented part facing to the
right. Insert the Needle and push it up
until it will go no farther.
While holding in place, securely tighten 5.
the Bolt.
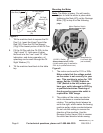
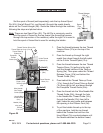
Bobbin Winder Operation
The Bobbin Winder is used to wind
thread onto the Bobbin. The Bobbin
Winder has two positions, ‘ON’ and
‘OFF’:
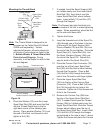
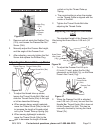
OFF Position
Figure 18
OFF
Position
Pull tab on
Connecting Rod (6i)
to disengage
Winder
Pull the tab on the Connecting Rod (6i)
to disengage the Winder from the Belt.
The Bobbin Winder will not contact the
belt.
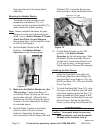
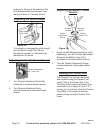
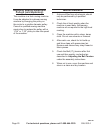
ON Position
Figure 19
ON
Position
Press here to
push Winder
toward Belt
This position is with the Connecting Rod
(6i) pressed, as shown above. The Shaft
on the Bobbin Winder will spin, winding
thread onto the Bobbin.
REV 07a, 10b