


Page 18 For technical questions, please call 1-800-444-3353. SKU 3914
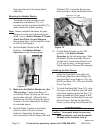
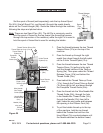
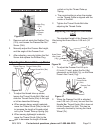
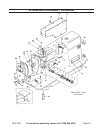
Feed Lifting
Shaft Crank (1e)
Feed Bar Body
Subassembly (4e)
Bolt (2e)
Figure 32
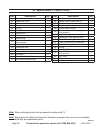
0.03”~0.033” ( )
0.028”~0.031” ( )
0.037”~0.041” ( )
1. Loosen the Bolt (2e) of the Feed Lifting
Shaft Crank (1e).
Move the Feed Bar Body Subassembly 2.
(4e) up or down to make the adjustment.
Tighten the Bolt (2e), being careful not to 3.
overtighten.
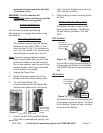
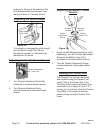
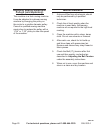
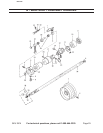
Adjusting Needle-to-hook Timing
Figure 33
Rubber Plug (46a)
&
Bolt (28c)
Needle Bar
(31c)
Needle
Bar
(31c)
Needle
Bar Lower
Bushing
(27c)
Hook
Blade
Point
Rotating
Hook (20c)
1. Turn the Hand Wheel (7b) to bring the
Needle Bar down to the lowest point of
its stroke.
Remove and set aside the Rubber Plug 2.
(46a). Loosen the Bolt (28c).
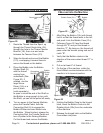
When using a DBX1 needle, align to 3.
marker line “A” on the Needle Bar (31c)
with the bottom end of the Needle Bar
Lower Bushing (27c), then tighten Bolt
(28c).
When using a DAX1 needle, align to
marker line “B” on the Needle Bar (31c)
with the bottom end of the Needle Bar
Lower Bushing (27c), then tighten the
Bolt (28c).
When using a DBX1 needle, loosen 4.
Rotating Hook (20c) Set Screws, turn
the Hand Wheel, and align the marker
line “B” on the Needle Bar (31c) with
the bottom end of the Needle Bar Lower
Bushing (27c).
When using a DAX1 needle, align the
marker line “D” on the Needle Bar (31c)
with the bottom end of the Needle Bar
Lower Bushing (27c).
After making the adjustments in steps 3 5.
and 4, align the Hook Blade Point on the
Rotating Hook (20c) with the center of
the Needle.
Provide a clearance of .001” to .004”
(0.04 to 0.1 mm) between the Needle
and the Hook Blade Point. This
clearance is less than 1/64” (almost
touching). Securely tighten the Set
Screws on the Rotating Hook. If the
clearance is too small, the tip of the
Hook Blade Point will be abraded. If it is
too large, it will lead to skipped stitches.
REV 10b