


10 684025
Determine the Ratio
Set the ratio based on your situation. If :
• The fluids are supplied at a ready–to–spray
viscosity, simply set the ratio as explained under
Adjusting the Ratio.
• The fluids are NOT supplied at ready–to–spray
viscosity, the ratio must be determined after the
reducer is added to the base, as instructed in
Procedure 1, below.
NOTE: Evaporation of the reducer in the base causes
chan
g
es in the ratio. To prevent evaporation, store
the base in a closed container.
NOTE: Some reducers have very little ability to lubricate
and many cause seals to dry out. To prolon
g
the
seal life, be sure your pump seals are compatible
with the base’s reducer. Contact your Graco
representative for the correct seals to use.
Procedure 1: Base is not pre-reduced
When addin
g
the reducer to the base before proportionin
g
with the VRHC system, determine the ratio of the
base/reducer mixture to the catalyst in order to set the
proper ratio.
Example:
The instructions on the can say “Mix 5 parts base to 1 part
catalyst. Then reduce 3 parts of this mixture to 1 part
reducer.”
1. Add the parts of the base and catalyst to find the parts
mixture.
5 parts base
+ 1 parts catalyst
6 parts mixture
2. The next statement on the can says, “Reduce 3 parts of
the mixture.” So divide the parts of the mixture by 3 parts
to reduce to find the parts reducer.
6 parts mixture
/ 3 parts to reduce
2 parts reducer
3. To determine the ratio of the secondary pump, add the
appropriate parts of base and reducer to find the parts
combined base/reducer.
5 parts base
+ 2 parts reducer
7 parts combined base/reducer to
1 part catalyst
The ratio of the pump is 7:1.
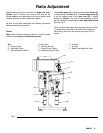
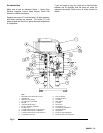
Relationship Between the Primary and
Secondary Pumps
Movin
g
the fulcrum point away from the primary pump
reduces the secondary stroke len
g
th, reducin
g
its fluid
output. Movin
g
the fulcrum point closer to the primary pump
increases the secondary stroke len
g
th, increasin
g
its fluid
output.
Fi
g
. 5 shows the relationship between the primary pump
and the secondary pump.
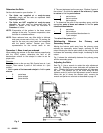
Adjusting the Ratio
See Fi
g
. 2. Use a wrench to rotate the ratio adjustment
screw (S). Rotatin
g
the screw clockwise will increase the
ratio. Rotatin
g
the screw counterclockwise will decrease
the ratio. The indicator pin (V) will move alon
g
the ratio
indicator scale (U) as the ratio adjustment screw is rotated.
When the pin is above the desired ratio, remove the
wrench and perform a ratio test as described on page 12.
Fig. 5