


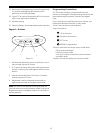
19
Placing Water Conditioning System Into
Operation (continued)
Caution:
If your system is a 255A (Alternating)
go to “Quick Cyling the Control for 255A Systems”.
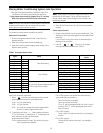
Quick Cycling the Control 255L and 255P
It is required that the control be quick cycled to specific
regeneration cycles when placing the conditioner into
operation. This will ensure that all of the air in the tank and
valve is purged. The process also provides a check for leaks
and functioning of the brine system. Please perform the
following steps for quick cycling the control, before
proceeding to start-up.
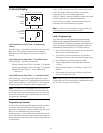
1. With the control in the treated water position, Press and
hold the REGEN button on the controller for 5 seconds.
This will initiate a manual regeneration. The control will
display a solid hourglass indicating that the motor and
camshaft are turning to the backwash cycle (C1). When
the control reaches the backwash cycle, the total
regeneration time remaining will be displayed. Pressing
the SET button will display the specific cycle time
remaining.
2. Press and release the UP and SET buttons to move the
control to the Regenerant Draw cycle (C2).
3. Repeat Step 2 to advance to each cycle.
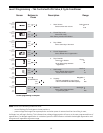
Before the final filling of the media tank with water
check that:
– the nearest water faucet is completely closed.
– the valve drain line is properly routed to a drain
– the regenerant tank is empty and the regenerant
hose is connected to the valve
– the water supply valve is off.
Note:
The control can be sent directly back to the
treated water position from any regeneration cycle. Press
the UP and SET buttons (about 5 seconds) until the
hourglass icon begins flashing. The control will now skip
all remaining regeneration cycles.
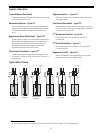
255 Alternating and parallel tank systems have one Logix
764 control that is mounted on tank 1. Tank 2 has a blank
faceplate and the valve is controlled by the Logix 764
control on tank 1.
4. Add water to the regenerant tank.
A. With a bucket or hose add approximately 4
gallons (15 liters) of water to the regenerant
tank.
B. If the tank has a salt platform in the bottom of
the tank, add water until the water level is
approximately 1 inch (25 mm) above the
platform.
Note:
It’s recommended that you do not put regenerant
into the tank until after the control valve has been put into
operation. With no regenerant in the tank, it is much
easier to view water flow and motion in the tank.
5. Press and hold the button on the controller for 5
seconds. This will initiate a manual regeneration.
The control will display a solid hourglass indicating
that the motor and camshaft are turning to the
backwash cycle (C1). When the control reaches the
backwash cycle, the total regeneration time
remaining will be displayed. Pressing the SET button
will display the specific cycle time remaining.
6. While the controller is in cycle C1 (Backwash), open
the water supply valve very slowly to approximately
the ¼ open position. Water will begin to enter the
media tank. Any air remaining will begin to be purged
to drain as the media tank fills with water.
WARNING:
If opened too rapidly or too far,
media may be lost out of the tank into the valve or
the plumbing. In the ¼ open position, you should
hear air slowly escaping from the valve drain line.
When all of the air has been purged from the media
tank (water begins to flow steadily from the drain
line), open the main supply valve all of the way. This
will purge the final air from the tank.
Allow water to run to drain until the water runs clear
from the drain line. This purges any debris from the
media bed.
7. Check Regenerant Draw.
A. Quick cycle the control to the C2 regenerant
draw/slow rinse position .
Note:
As you advance through each cycle there will be a
slight delay before you can advance to the next cycle.
There will be a pause after the regenerant draw and slow
rinse cycles. This cycle (C4) is a repressurization cycle and
is designed to allow the water pressure to equalize on
each side of the valve discs. Allow the control to
repressurize (3 minutes) before cycling the control to the
regenerant tank refill position.
B. C2 will be displayed. With the control in this
position, check to see that the water is being
drawn out of the regenerant tank. The water
level in the regenerant tank should recede
very slowly.