


1
2
3
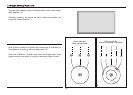
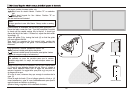
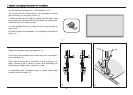
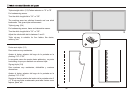
Instalar la zurcida plancha (1).
Poner la labor debajo del pie. Colocar el boto n en el sitio marcado.
Bajar el pie. Dejar el ancho de la puntada a "0" y coser primero unos
puntos de remate. Regular el ancho de la puntada. Hacer un punto de
prueba da ndole al volante con la mano hasta que la aguja entre
exactamente en el agujero izquierdo (segu n el boto n puede variar el
ancho de la puntada). Coser el boto n. Poner el ancho de la puntada a
"0" y hacer algunos puntos de remate.
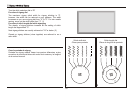
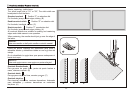
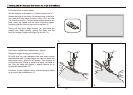
Para coser un boto n que quede separado del tejido (con cuello),
colocar una aguja sobre el boto n y coser por encima de ella. (3) En
caso de botones con 4 agujeros, empezar siempre con los dos
anteriores (2), despue s correr el cosido hacia adelante y continuar el
trabajo como indicado anteriormente. (3)
Install the darning plate. (1)
Position the work under the foot. Place the button on the marked
position, lower the foot, adjust stitch width to "0" and sew a few
securing stitches. Adjust the stitch width. Turn the handwheel to check
that the needle goes cleanly into the left hole of the button (adjust the
stitch width according to the button), and sew on the button. Adjust the
stitch width to "0" and sew a few securing stitches.
If a shank is required, place a darning needle on top of the button and
sew. (3) For buttons with 4 holes, sew through the front two holes first
(2), push work forward and then sew through the back two holes as
described. (3)
28