


www.enviromaster.com
25
WLCA/WLHA High Wall Evaporator
Note: While in Remote thermostat
mode (see conguration), only the
“FAN” and “TIME” buttons are acti-
vated and will beep when pressed.
Memory Backup:
In the event of a power failure the control will
retain all of it’s settings including the mode
of operation. When power is restored, after
a three minute time delay, the control will re-
turn to the mode of operation that it was in
prior to the power failure.
Fault Conditions
Room air sensor fault: E01
If the room air sensor is disconnected,
damaged or malfunctions the LCD display
will ash error code “E01” to signify that
a fault has occurred. Operation will con-
tinue with the control using the last known
value for the room air sensor.
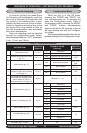
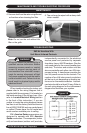
SEQUENCE OF OPERATION – WALL MOUNTED THERMOSTAT MODE
Condensate fault: E02
If the control senses a condensate fault
condition either through the optional con-
densate pumps safety switch or the drain
pan sensors, the LCD display will ash
error code “E02”. The compressor will
switch off for a minimum of three minutes
and until the fault condition is corrected.
ID coil sensor fault: E03
The indoor coil sensor monitors the tem-
perature of the indoor coil. If a freeze
condition exists continuously for three
minutes, the LCD will display error code
“E03” to signify that a fault has occurred.
The compressor will switch off for a mini-
mum of three minutes and until the fault
condition is corrected. Also, if the micro-
processor detects an evaporator freeze
condition four times within a 24 hour pe-
riod, the lter check indicator will appear.
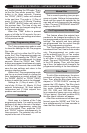
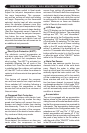
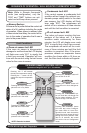
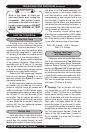
INFRARED REMOTE CONTROL OPTION
Operational Range 55- 90° F (in 1° Increments.)
NOTE: Batteries Included.
Pressing the “+” will increase
the set point temperature setting.
Pressing the “-“ button will de-
crease the setpoint temperature
setting.
POWER
Pressing the “POWER” button will
turn the unit On or Off.
FAN
Pressing the “FAN” button will
place the unit in fan mode.
AUTO
Pressing the “AUTO” button will
place the unit in Auto changeover
mode.
FAN SPEED
Pressing the “FAN SPEED” but-
ton will scroll the unit through fan
the fan speed selection. The se-
quence is High, Low and Auto.
HEAT
Pressing the “HEAT” button will
place the unit in Heat mode.
COOL
Pressing the “COOL” button will
place the unit in Cool mode.
DRY
Pressing the “DRY” button will
place the unit in Dry Mode.
LOUVER
Pressing the “LOUVER” button
will enter the Louver Congura-
tion mode. While in Louver Con-
guration mode, each successive
press of the louver button will scroll
through the louver positions. After
idle for 10 seconds, the control
will exit the Louver Conguration
mode.
Figure 6