


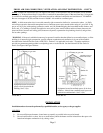
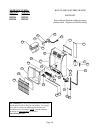

INSTALLING HEATER
WALL MOUNT (BFT10)
STEP 1. Remove wall mounting bracket from back of
heater.
STEP 2. Locate wall stud.
STEP 3. Attach wall mounting bracket to wall stud
with top at desired height, using (2) screws provided.
Make sure top of bracket is level. See Figure 3.
STEP 4. Hang top of heater on wall mounting bracket.
STEP 5. Remove bottom front panel.
STEP 6. Secure back of heater to wall, utilizing
anchors (if necessary) or wood screws. See Figure 4.
WALL MOUNT
BFT20 & BFT30
STEP 1. Remove wall mounting bracket from back of
heater.
STEP 2. Locate two studs.
STEP 3. Attach wall mounting bracket to wall studs with
top at desired height using (2) wood screws provided.
Make sure top of bracket is level. See Figure 5.
STEP 4. Hang top of heater over wall mounting bracket.
STEP 5. Remove bottom front panel.
STEP 6. Secure back of heater to wall, utilizing anchors (if
necessary) or wood screws. See Figure 4.
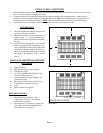
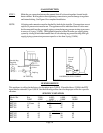
WALL STUD
WALL
MOUNTING
BRACKET
FIGURE 3
Wall Mounting Bracket
Wall Stud
FIGURE 5
HOLES FOR MOUNTING BACK OF
HEATER TO WALL
FIGURE 4
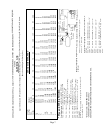
Page 9
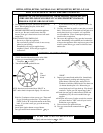
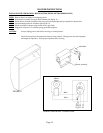
HEATER
Make sure this cut-out
faces back of heater.
INSTALLING VF-FSK FLOOR BASE KIT
STEP 1. Remove floor base from carton.
STEP 2. Align screw holes in base to holes in heater
bottom.
STEP 3. Align cut-out in bottom of heater with the cut-out
in top of floor base. The cut-out in side of floor base must
face towards the back of the heater (see illustration below).
STEP 4. Attach floor base to bottom of heater using four
#8 screws (provided).
NOTE: Floor bases are for use on BFT10, BFT20 and
BFT30.