


27
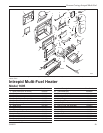
Vermont Castings Intrepid Multi-Fuel
2000970
7. For doors, replace the doors and close them on
a piece of waxed paper to keep the cement from
migrating onto the stove front, or tap other parts with
the rubber mallet (or hammer/block of wood).
8. Clean excess cement from around the channel. Let
the cement that holds the new gasket dry thoroughly.
Adjust the Door if Necessary
The door latch or damper mechanism may need adjust-
ment after you have regasketed them. Initially, it may
require loosening to accommodate the new gasket; af-
ter a few weeks, it may need tightening to compensate
for compression of the new gasket. The directions for
adjusting the latch and damper are on page 26.
Permanent Gaskets
Other gaskets seal between non-moving parts, but
these are not subject to the same wear and deteriora-
tion as gaskets on moving parts. It is unlikely that you
will ever need to replace these gaskets unless the
involved parts are disassembled and then put back
together. If this is the case, the job should be done only
by a qualified service technician. The diameter of the
gasket that seals these non-moving parts is 5/16”, and
the areas sealed are the flue collar to the stove back;
and the lower fireback to the sides. Refer to Page 26 for
information on the glass panels and their gaskets.
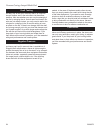
ST559
Remove
gasket
11/30/00 djt
ST560
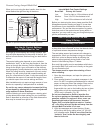
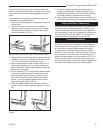
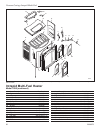
Fig. 43 Remove gasket then clean channel with wire brush.
Wait until the fire is out and the stove has cooled. Be
sure to follow the standard safety procedure for working
with dusty materials: Wear safety goggles and a dust
mask.
The procedure for replacing the gaskets is the same,
regardless of the gasket location.
1. Remove the existing gasket by grasping an end and
pulling firmly.
2. Use a wire brush or a screwdriver to clean the
channel of any remaining cement or bits of gasket.
Remove stubborn deposits of cement with a cold
chisel if necessary. (Fig. 43)
3. Determine the correct length of the appropriate-sized
gasket by laying it out in the channel. Allow an extra
1-2” (25-51 mm) and mark the spot to be cut.
4. Remove the gasket from the channel, place it on a
wood cutting surface, and cut it at the marked spot
with a utility knife. Twist the ends slightly to keep the
gasket from unraveling.
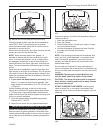
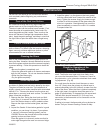
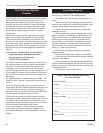
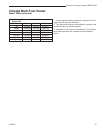
5. Lay an unbroken 1/8” (3 mm) bead of gasket cement
in the newly-cleaned channel. Starting at one end,
press the gasket into the channel. Ensure a good
joint where the gasket meets before trimming any
excess. Do not overlap the gasket ends or leave
ends with ragged edges. (Fig. 44)
6. Press the gasketed part firmly against its normal
mating surface to seat the gasket evenly in its chan-
nel.
ST559
Remove
gask
et
11/30/00 djt
Cement
Sto
ve Gasket
ST561
Fig. 44 Lay a bead of gasket cement then press new gasket
in place.