


13
Unpacking........................................................... 14
General Guide .................................................... 15
Operation Reference.......................................... 18
To record an image............................................................. 18
To view images stored in memory ...................................... 19
To delete images stored in memory ................................... 20
Function Reference ........................................... 21
Record Functions................................................................ 21
Playback Functions............................................................. 23
Power Supply ..................................................... 25
To load batteries ................................................................. 25
Using AC Power ................................................................. 30
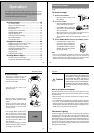
Getting Acquainted
This part of the manual contains information on unpacking, the
names of controls and components, and power supply information. It
also has sections that cover basic operations to let you begin enjoy-
ing the QV-10 as quickly as possible.
Getting Acquainted
14
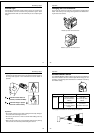
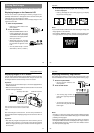
Unpacking
Check to make sure that all of the items shown below are included
with your QV-10. If something is missing, contact your dealer as soon
as possible.
QV-10
Cleaning Cloth
Soft case
Alkaline batteries (AA-size
×
4)
Special video cable
Manual and warranty
AC adaptor AD-C60
Wrist Strap
• See page 17 for instal-
lation instructions.
15
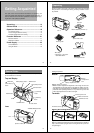
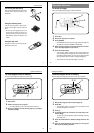
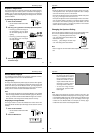
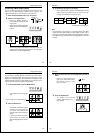
General Guide
The following illustrations show the names of each component, but-
ton and switch on the camera.
Top and Display
/PROTECT
(Timer/Protect)
button
DISP (Display) button
MODE button
DEL (Delete) button
Shutter button
[+] (Forward)
button
[–] (Reverse)
button
Function switch
POWER switch
LCD
ZOOM button
Lens
NORMAL/MACRO switch
Lens
Aperture switch
Getting Acquainted
16
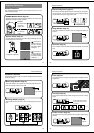
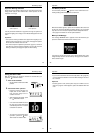
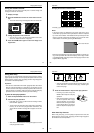
Bottom
Tripod hole
Battery
compartment
lock
Battery compartment cover
BRIGHT (brightness) control
• BRIGHT control adjusts the brightness of the image on the LCD.
The brightness is set at the factory to the optimum setting, and nor-
mally does not need adjustment. Use BRIGHT control to make ad-
justments after replacing batteries, or any other time you feel the
LCD image brightness is too dark or too light.
Terminals
Terminal panel cover
VIDEO OUT terminal
DIGITAL terminal
AC Power terminal
Opening the Terminal Panel Cover
Important!
Make sure that the terminal panel cover is slid fully away as shown in
step 2 above before trying to raise it. Forcing the cover up can seri-
ously damage it.
11
11
1
22
22
2
33
33
3