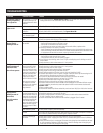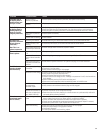
Problem Possible Cause Action
Heater burnout
Improper wiring • Verify proper voltage applied to heater.
• Verify proper electrical connections.
Water level is too low. • Replace probe assembly.
Mineral buildup on heaters • If heaters are on continuously and therefore not expanding and contracting with on-off cycles
to shed mineral buildup, the humidifier may be undersized. Replace with a larger unit or add an
additional humidifier.
• Inspect chamber for severe mineral buildup on or around heater. If present, increase cleaning
frequency or use softened supply water.
Heater corrosion • Inspect heater for surface corrosion or pitting. This is usually caused by a high chloride level in
the supply water.
Unit does not fill
with water.
No water supply to fill valve • Verify that manual water supply valve is open and that pressure exists.
• Check if water supply line strainer is plugged. Clean strainer or replace.
• Verify fill valve electrical plug is fully engaged.
Unit control is not on • Press On/Off switch on display panel.
• Verify transformer electrical plug is fully engaged.
Malfunctioning fill valve • Unplug probe head. Fill valve should open. If fill valve does not open:
– Verify fill valve electrical plug is fully engaged.
– Verify proper 24 VAC (terminals 33 and C) to fill valve. If voltage is present and valve does not
open, replace valve.
Malfunctioning level
control system
• Check terminals 3, 4, 5, and C on the internal controller board terminal block for correct wiring.
Humidifier is in auto drain
mode.
• Normal operation. Chamber will fill after completing auto drain sequence.
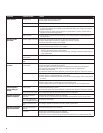
Fill valve does
not close.
Malfunctioning level
control system
• Check that probe electrical plug is fully engaged.
• Verify that probe is wired per wiring diagram.
• Verify the green and yellow ground wire is connected to the C terminal and the subpanel.
• If the internal control board relay output is shorted to fill valve coil, replace board.
• If needed, clean probe rods.
• Check water conductivity. Water conductivity must be at least 100 µS/cm
2
. Add salt to increase.
Fill valve is stuck open. • Check for control voltage across fill valve coil (terminals 33 and C on control terminal strip).
• Check if fill valve is installed backwards. If yes, repipe.
• Check if there is an obstruction that does not allow valve to seat properly. Clean or replace valve
as needed.
Drain valve is open. • If automatic drain valve is locked in manual open position, reset to automatic.
• Replace valve if there is a broken return spring on the drain valve.
• Clean or replace drain valve if an obstruction in the valve does not allow complete closure.
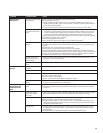
Fill valve cycles on
and off frequently
(several times per
minute)
Malfunctioning level
control system
• If needed, clean probes.
• Verify that probe wiring is correct.
• Check water conductivity. Water conductivity must be at least 100 µS/cm
2
. Add salt to increase.
Drain valve not fully closed • If an obstruction does not allow drain valve to fully close, clean valve.
Unit does not perform
autodrain sequence
No power to automatic
drain valve
• Verify drain valve electrical plug is fully engaged.
• Check if 24 VAC is present at the internal controller board terminals 32 and C for drain valve.
Drain fault, plugged drain
valve, or plugged drain pipe
• Check drain valve piping.
Defective automatic drain
valve
• If voltage is present at valve and it still does not open, replace valve.
Unit does not perform
end-of-season drain
Input signal always has a
demand
• Reduce demand signal at the humidistat.
Drain valve • Verify drain valve electrical plug is fully engaged.
• Verify drain valve is wired correctly to control board.
• Check 24 VAC across valve coil during test cycle (terminals 32 and C on control terminal strip).
34


