


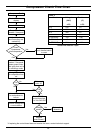

24
Heating Element Replacement
Replacement heating elements must be of the same
style and Voltage/wattage rating as the ones originally in
the water heater. This information can be found on the
fl ange or terminal block of the element or on the water
heater data plate.
IMPORTANT: Before replacing any element, confi rm
that you have the correct replacement element
(wattage). This water heater has a folded 4500 watt
upper element and a folded 2000 watt lower element.
DO NOT replace the element(s) with a wattage, style
or shape different than the elements specifi ed for the
upper and/or lower element.
1. Turn off power to the water heater at the breaker
disconnect switch serving the water heater.
2. Verify there is no power at the incoming power
connection to the water heater with an AC volt
meter.
3. Open a nearby hot water faucet and allow to run
until the water is no longer hot.
4. Drain the water heater by connecting a hose to
the drain valve and terminating it to an adequate
drain or to the exterior of the building. When unit
is drained, close the drain valve and remove
hose.
5. Remove the access cover, then remove the foam
insulation block.
6. Remove the protective plastic cover from the
attachment point.
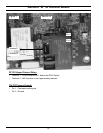
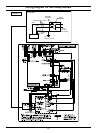
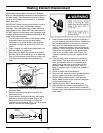
7. Disconnect the electrical wires from the heating
element by loosening the screws (Figure 14).
Remove the screw-in element by turning the
element counterclockwise with a 1-1/2 inch socket
wrench. Remove the existing gasket.
8. Clean the area where the gasket fits to the tank. If
you are replacing the bottom element, remove any
accumulated sediment on the bottom of the tank.
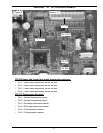
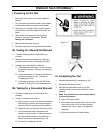
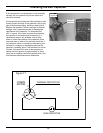
9. Make sure the replacement element has the
correct voltage and wattage rating and shape by
matching it to the rating plate on the water heater.
Position the new gasket(s) on the element and
insert it into the water heater tank (Figure 15).
Tighten the element by turning it clockwise until
secure.
10. Close the drain valve and open the nearest hot
water faucet. Then open the cold water shut off
valve and allow the tank to fill completely with
water. To purge the lines of any excess air and
sediment, keep the hot water faucet open for
three (3) minutes after a constant flow of water is
obtained.
11. Check for leaks around the element.
12. Reconnect the electrical wires to the element and
securely tighten the screws (See Figure 14).
13. Replace the protective plastic cover removed
earlier. Make sure the cover is securely engaged
on the attachment points.
14. Replace the foam block and access cover.
15. Although this water heater is equipped with “Dry
Fire” protection circuitry, be sure tank is completely
filled with water before applying electrical power to the
water heater.
Screws
Wires
Element
Figure 14
Spud
Gasket
Screw-in
Element
Figure 15