


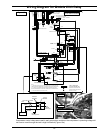
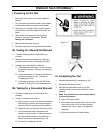

23
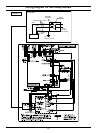
E l ement Test (OhmMeter)
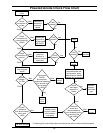
IIA. Testing for a Burned Out Element
1. Complete Preparing for the Test before you
proceed.
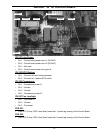
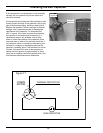
2. Measure the element’s resistance by placing a
probe on each terminal. (See graphic at right.)
3. Compare your result with the following:
A. If the resistance is between 10 and 25 Ohms,
the element is good. Proceed to Completing
the Test.
B. If the meter shows no continuity, the element
should be replaced (p. 24). Proceed to
Completing the Test.
C. If the meter measures more than 25 Ohms,
proceed to Testing for a Grounded Element.
IIB. Testing for a Grounded Element
1. Complete Preparing for the Test before you
proceed.
2. Check for resistance as follows:
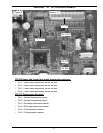
A. Place a probe on one of the element terminals
and the other probe on the element fl ange or
tank shell. Ensure a good ground connection.
B. Repeat the test for the other element terminal.
C. If both tests show infi nite resistance, the
element is not grounded. If either test shows
less than infi nite resistance, the element is
defective and should be replaced (p. 24).
D. Proceed to Completing the Test.
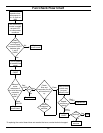
III. Completing the Test
1. Replace the element(s) if necessary (p. 24).
2. Reconnect the terminal wires.
3. Reinstall the thermostat cover(s), put the
insulation back in place, then reinstall the cover
panel(s).
4. Make sure that the tank is full of water before
reconnecting power.
A. Open a hot water faucet.
B. Once water fl ows smoothly from the hot water
side of the faucet, all air has been purged
from the tank and it is safe to energize the
elements.
C. Reconnect power to the water heater.
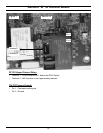
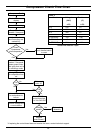
I. Preparing for the Test
1. Press the power button on the User Interface
Module.
1. Turn off power to the water heater at the breaker
or disconnect switch serving the water heater.
2. Verify there is no power at the incoming power
connections to the water heater with an AC volt
meter.
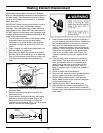
3. Remove the cover panel(s), then move the
insulation away from the element. Do not
damage the insulation.
4. Remove the thermostat cover(s).
5. Disconnect the wires from the element terminals.
Figure 13