


11
General Service information
• Volts times Amps = Watts
• Watts divided by Volts = Amps
• Replacement Elements:
Use replacement elements that are rated at the
same wattage, voltage and shape indicated on
the heater model and rating plate. Installing an
element with a higher voltage rating or wattage
output may create a safety hazard. (It could
overload the heater wiring, the supply wiring, or the
fusing.) Installing an element with a lower wattage
or voltage rating will reduce performance.
Also, select replacement elements with the most
surface area (low watt density) available for your
water heater. By spreading the heat of the element
over a greater area, the lime (calcium) buildup rate
should be reduced.
Elements constructed of Incoloy are much more
durable than zinc-coated copper elements.
• Element Cycling:
Most two-element water heaters are non-
simultaneous. In other words, only one element
operates at a time.
If the upper element fails, the customer will lose hot
water. (Power switches to the lower element only
after the water at the top of the tank is heated.) If
the lower element or thermostat fails, the customer
should still have hot water in the top 1/3 of the tank.
Also, with two-element water heaters, the lower
element and thermostat will cycle more frequently
than the upper element and thermostat. For this
reason, the lower element will normally accumulate
lime faster and fail more often than the upper
element. This increased cycling also causes
lower thermostats to fail more often than upper
thermostats.
Routine Preventive Maintenance
At least monthly, a visual inspection should be made of the following:
• Air Filter (Remove and inspect, clean if needed, and reinstall).
• Condensate drain pan and condensate lines.
• The lower metal drain pan for standing water which may indicate a clogged condensate drain pan, condensate
lines, or plumbing leak.
• Leaking or damaged water piping.
• Presence of corrosive materials in the installation area.
• Presence of combustible materials near the water heater.
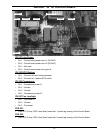
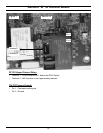
• After servicing this water heater, check to make sure it is working properly, see “Operational Overview/Initial Start
Up” (p.12)
IMPORTANT: If you lack the necessary skills required to properly perform this visual inspection, you should not
proceed, but get help from a qualified person.
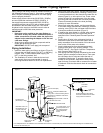
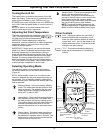
Cleaning/Replacing the Air Filter
Air Filter Cleaning/Replacement
IMPORTANT: Before attempting to clean or replace the air fi lter, press the power button to place the water heater
in Standby Mode and turn-off power to the water heater at the circuit breaker/fuse box.
1. Locate the screw securing the filter panel to the heat pump shroud and remove it.
2. Remove (slide) the filter from the unit.
3. If you are replacing the filter, skip to step 4. To clean the filter, use a vacuum with a hose attachment to
remove any dust or debris.
4. Place the new or cleaned filter into the filter panel and secure the filter to the shroud with the screw loosened
earlier. Use the slots for guides when inserting the filter into the water heater and replace the screws.
5. Restore power to the water heater and press the power button to turn the water heater on.
NOTE: The water heater will conduct a system diagnostic prior to operation.