


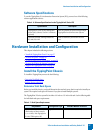

Chapter 3: TippingPoint X505 Overview
22 X-Series Hardware Installation and Safety Guide V 2.5
STEP E Define additional user accounts if desired.
At this point, your initial configuration of the X505 is complete. You can use the LSM to change
settings in the future.
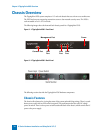
Connect the X505 to the Internet
STEP 1 Use an Ethernet cable to connect the X505 WAN port to your router. If the X505 is
configured to receive its WAN IP address by DHCP, PPPoE, PPTP, or L2TP, the device
connects to your service provider. This may take a minute or more.
STEP 2 Check the status of the external virtual interface with the LSM or the CLI. If active, the inter-
face will be in “Up” status, and will have an IP address.
STEP 3 Use your web browser to connect to an external URL, such as http://www.tippingpoint.com
If you can see the web site, your internet connection is active, and you can register your
device and configure other features of the X505.
Register the TippingPoint X505
To activate your license, you must register the TippingPoint X505 on the 3Com eSupport Web site
(http://esupport.3com.com). Have the following information available:
• Product code 3CRTPX505-73.
• Serial number. You can find the serial number:
— in the Local Security Manager (LSM), on the System Summary page.
— with the Command Line Interface (CLI) show version command.
— on the bottom of the X505 unit, on the bar code sticker.
• Product purchase information:
— Company Purchased From
—Purchase Location City
— Warranty Start Date in the format mm/dd/yyyy
Note: When you connect to the LAN address, your browser may display a
security certificate warning. Accept the certificate and continue with the
configuration procedure.