___________________________________________ PC Setup 4-49
5. Click Print Calibration Page. A test page similar to the one
shown in the Calibration Page section prints.
D
D
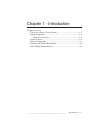
Measure dashed line from top edge of
paper to right arrow tip; enter results in
millimeters in box D.
C
Measure solid horizontal line from left arrow
tip to right arrow tip; enter results in
millimeters in box C. This should be
close to the value shown in box H.
B
Measure dashed line from top edge of
paper to left arrow tip; enter results in
millimeters in box B.
A
B
C
F
A
Measure dashed line from left edge of
paper to top arrow tip; enter results in
millimeters in box A.
E
E
Measure solid vertical line from top arrow
tip to bottom arrow tip; enter results in
millimeters in box E. This should be
close to the value shown in box G.
F
Measure dashed line from left edge of
paper to bottom arrow tip; enter results in
millimeters in box F.
G
H
254.0
190.5
I
Measure dashed line from bottom edge of
paper to left arrow tip; enter results in
millimeters in box
I
.
J
Measure dashed line frombottom
edge of paper to bottom arrow tip;
enter results in millimeters in box J.
I
J
Fig. 4.30 X-ACT Calibration Page
6. Make the measurements indicated on the calibration page next
to boxes A through F, I, and J, recording each measurement in
its corresponding box on the calibration page. The values in
boxes G and H are fixed values and do not require you to
make any measurements.
7. Copy the recorded measurements in boxes A through F, I, and
J and the fixed values in boxes G and H from the calibration
page to the corresponding boxes in the Enter Calibration
Values section of the More X-ACT window.
8. Click Update Printer.
Note: When you click Update Printer, a window displays the
Printer Calibrated message. Click OK to continue and
all the numbers clear automatically from the boxes in
the Enter Calibration Values section. Do not enter the
values again. Also, if you click Reset Printer, you can
reset all settings or the selected media type.