


56 YORK INTERNATIONAL
recommends the use of this type of organization. The
Dow Industries Service Division of the Dow Chemical
Company, Tulsa, Oklahoma, with branches in principal
cities is one of the most reliable of these companies.
TESTING FOR COOLER AND CONDENSER
TUBE LEAKS
Cooler and condenser tube leaks in R-22 or R-134a
systems may result in refrigerant leaking into the wa-
ter circuit, or water leaking into the shell depending on
the pressure levels. If refrigerant is leaking into the
water, it can be detected at the liquid head vents after
a period of shutdown. If water is leaking into the refrig-
erant, system capacity and efficiency will drop off
sharply. If a tube is leaking and water has entered the
system, the cooler and condenser should be valved
off from the rest of the water circuit and drained imme-
diately to prevent severe rusting and corrosion. If a
tube leak is indicated, the exact location of the leak
may be determined as follows:
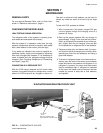
1. Remove the heads and listen at each section of
tubes for a hissing sound that would indicate gas
leakage. This will assist in locating the section of
tubes to be further investigated. If the probable lo-
cation of the leaky tubes has been determined, treat
that section in the following manner (if the location
is not definite, all the tubes will require investiga-
tions).
2. Wash off both tube heads and the ends of all tubes
with water.
NOTE: Do not use carbon tetrachloride for this pur-
pose since its fumes give the same flame
discoloration that the refrigerant does.
3. With nitrogen or dry air, blow out the tubes to clear
them of traces of refrigerant laden moisture from
the circulation water. As soon as the tubes are clear,
a cork should be driven into each end of the tube.
Repeat this with all of the other tubes in the sus-
pected section or if necessary, with all the tubes in
the cooler or condenser. Allow the cooler or con-
denser to remain corked up to 12 to 24 hours be-
fore proceeding. Depending upon the amount of leak-
age, the corks may blow from the end of a tube,
indicating the location of the leakage. If not, if will
be necessary to make a very thorough test with
the leak detector.
4. After the tubes have been corked for 12 to 24 hours,
it is recommended that two men working at both
ends of the cooler carefully test each tube – one
man removing corks at one end and the other at
the opposite end to remove corks and handle the
leak detector. Start with the top row of tubes in the
section being investigated, remove the corks at the
ends of one tube simultaneously and insert the ex-
ploring tube for 5 seconds – this should be long
enough to draw into the detector any refrigerant
gas that might have leaked through the tube walls.
A fan placed at the end of the cooler opposite the
detector will assure that any leakage will travel
through the tube to the detector.
5. Mark any leaking tubes for later identification.
6. If any of the tube sheet joints are leaking, the leak
should be indicated by the detector. If a tube sheet
leak is suspected, its exact location may be found
by using a soap solution. A continuous buildup of
bubbles around a tube indicates a tube sheet leak.