


9.
10.
11.
12.
13.
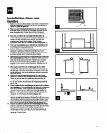
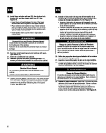
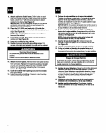
Attach cabinet to finish frame. Drill 4 holes on each
side and 2 holes in the top of the cabinet into the finish
frame. Use #lo x 1” (25 mm) wood screws to attach
cabinet to the frame. See Figure 27.
IMPORTANT: Do not overtighten screws or the cabinet
will distort and provide a poor air seal between the
cabinet and the air conditioner.
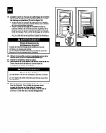
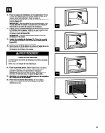
Place the 2%’ (63.5 mm) seal strip (J) inside the
cabinet. Make sure the seal is flush with the cabinet front
edge. See Figure 28.
NOTE: This seal strip fits between the air conditioner
base and the cabinet.
Insert drain cup (I). Place drain cup through hole in
cabinet rail. See Figure 29.
Insert air conditioner Into cabinet.
Reattach ground wire with grounding screw. Put
excess grounded wire between the coils and the cabinet.
Electrical Shock Hazard
Air conditioner ground wire must be attached to the
cabinet.
Failure to do so could resuft in electrical shock.
14.
15.
16.
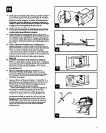
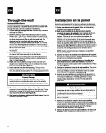
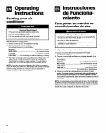
Attach the front panel. Remove the 2 front panel screws
from unit base. Replace front panel by pushing it straight
on and then lowering it slightly to lock it in place. Attach
bottom front of panel by reinserting the 2 front panel
screws. See Figure 30.
Caulk all outside wall openings around the installa-
tion and cabinet.
Install decorative molding. If desired, install molding
around room side of cabinet.
9.
10.
11.
12.
13.
Colocar la caja metllica en el rnarco de acabado.
Taladrar 4 agujeros a cada lado y 2 a trav& de la pane
superior de la caja metalica hacia el marco. Usar 10s
tornillos de madera #10 x 25 mm (1”) para sujetar la caja
metalica al marco. Ver Figura 27.
IMPORTANTE: No apretar demasiado 10s tomillos pues la
caja metalica se deformare y no obturara bien el aire entre
la caja met&a y el acondicionador de aire.
Colocar la cinta obturadora de 83,5 mm (2.5’) (J)
dentro de la caja metilica Asegurarse de que la cinta
obturadora este al ras con el borde delantero de la caja
met&a. Ver Figure 28.
NOTA: Esta cinta obturadora calza entre la base del
acondicionador de aire y la caja met&a.
Insertar la taza de drenaje (T). Colocar la taza de
drenaje a traves del agujero en el travesafio de la caja.
Ver Figura 29.
lnsertar el acondicionador de aire en la caja metalica.
Vofver a instalar el alambre de puesta tlerra en el
tornillo de puesta tierra. Colocar el exceso del alambre
de puesta a tierra entre 10s serpentines y la caja metalica.
Riesgo de Choque EMctrko
El alambre de puesta a tierra del acondiiionador de aire
debe ser conectado a la caja metalica de lo contrario se
puede ocasionar un choque el&trico.
14. lnstalar el panel delantero. Sacar 10s 2 tornillos del panel
delantero que estan en la base del artefacto. Volver a
colocar el panel delantero empujandolo derecho y luego
haciendolo descender ligeramente para que se trabe en
su lugar. Sujetar la parte inferior del panel delantero
volviendo a insettar 10s 2 tornillos de la base. Ver
Figura 30.
15. Calafatear todas las aberturas de la pared exterior
alrededor de la instalaci& y de la caja met8lica.
16. lnstalar moldura decorative. Si se desea, instalar
moldura alrededor de la caja metalica por el lado de la
habitation.
24