


Through-the-wall
installation
It is the consumer’s responsibility and obligation to have this
product installed by a qualified technician who is familiar with
through-the-wall room air conditioner installations.
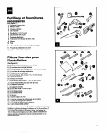
1. Cut an opening through the wall. Remove any insulation
and keep for Step 8.
2. Measure depth of wall opening and construct finish
frame. Use 1” (25 mm) or heavier lumber for wood frame
construction. When using a wood, metal or plastic molding,
the finish frame should line up with the inside wall. If a
plastered wall is to be flush with the cabinet, and no
molding is used, the finish frame must be set lh” (13 mm)
into the wall. See Figures 21 and 22 for Frame Construc-
tion and Brick Veneer Construction information. See Figure
23 for finish frame sizes.
NOTE: Apply wood preservative to the surface exposed to
the outside.
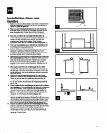
3. Insert finish frame into wall opening. Square and level
the frame. Nail frame securely to the wall studs.
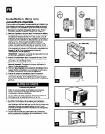
4. Remove the ground wire and screw from the front of
the unit base. Save grounding screw for reattachment in
Step 13. See Figure 24.
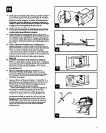
5. Slide unit out of cabinet. Grasp handle and slide unit
straight out of cabinet. Place unit on cardboard to protect
your floor covering. See Figure 25.
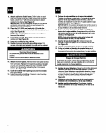
6. Insert cabinet into the wall opening. The top of the
cabinet should extend %’ (13 mm) into the room. If there is
trim, the cabinet should extend %” (13 mm) passed the trim.
Property Damage
Make sure the air conditioner cabinet has the proper
outward slope so condensate water runs to the outside.
Failure to do so could result in damage to the floor or wall.
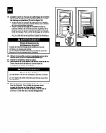
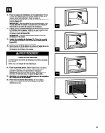
7. Check the outward slope of the cabinet. Place a
carpenter’s level inside the cabinet on the right side. There
should be 1 bubble (U” [6 mm]) slope toward the outside.
Also check the left side. See Figure 26.
8. Seal opening between cabinet and finish frame. Use the
insulation removed in Step 1.
lnstalacibn en la pared
Es responsabilidad y obligation del consumidor de que este
product0 sea instalado por un tecnico calificado famiiiarizado
con las instalaciones de acondicionadores de aire en la pared.
1. Cortar una abertura en Ia pared. Sacar el aislamiento y
guardarlo para usarlo en el Paso 8.
2. Medir la profundidad de la abertura de la pared y
construir el marco de acabado. Usar madera de 25 mm
(1”) o mls gruesa para la construccibn del marco de
madera. Cuando se usa una moldura de madera. de
plastic0 o de metal, el marco de acabado debe estar
alineado con la pared interior. Si la pared enyesada debe
quedar a ras con la caja met&a y no se usa moldura, el
marco de acabado debe estar 13 mm (95”) hacia dentro de
la pared. Ver las Figuras 21 y 22 para informacidn sobre la
construccibn del marco y la construction del revestimiento
de ladrillo. Ver la Figura 23 para 10s tamaiios de 10s
marcos de acabado.
NOTA: Aplicar preservante para madera a la superficie
expuesta al exterior.
3. Inset-tar el marco de acabado en la abertura de la pared.
Escuadrar y nivelar el marco. Sujetar firmemente con clavos
el marco a 10s montantes de la pared.
4. Sacar el alambre de puesta a tierra y el tornillo de la
parte delantera de la base del artefacto. Guardar el
tornillo de puesta a tierra para volver a colocarlo en el Paso
13. Ver Figure 24.
5. Deslizar el artefacto fuera de la caja metilica. Tirar de la
manija y deslizar el acondicionador de aire derecho fuera
de la caja metalica. Colocar el artefacto sobre un carton
para proteger sus alfombras. Ver Figura 25.
6. lnsertar la caja met6lica en la abertura de la pared. La
parte superior de la caja metalica debe extenderse 13 mm
(55”) hacia la habitation. Si existe guarnicibn, la caja
metPica debe extenderse 13 mm (54”) m&s alla de la
. .,
guamrcron.
Daiios Materiales
Asegljrese de que la caja metalica del acondicionador de
aire este inclinada hacia fuera de modo que el agua de
condensacidn escurra hacia el exterior.
De lo contrario, se puede causar daiio al revestimiento del
piso o a la pared.
7. Verificar la inclination exterior de la caja metilica.
Colocar un nivel de carpintero dentro de la caja met&a en
el lado derecho. Debe tener una inclination hacia afuera de
aproximadamente una burbuja (6 mm [l/4*]). Revisar
tambidn el lado izquierdo. Ver Figura 26.
8. Dbturar la abertura entre la caja meWice y el marco de
acabado. Usar el aislamiento que se sacd en el Paso 1.
22