


9
Please Do Not Return This Product To The Store. Contact your local Wayne-Dalton dealer. To find your local Wayne-Dalton dealer, refer to your
local yellow pages/business listings or go to the Find a Dealer section online at www.wayne-dalton.com
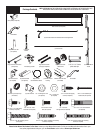
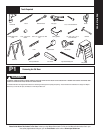
Tools Needed:
Tools Needed:
INSTALLATION
4
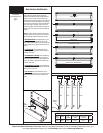
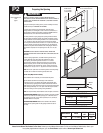
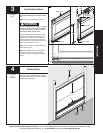
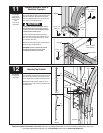
Bottom Section
Center the bottom section in the door opening.
Level section using wooden shims under the bottom
astragal if necessary. Hold the section in the opening
while attaching vertical tracks.
Level
Wood Shims
Level
Header
Jamb
Bottom
section
Wooden
shims
Weather
seal
3
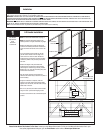
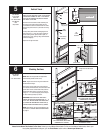
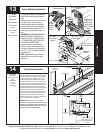
Counterbalance Cables
None
Hinge tube
Bottom bracket
Bottom section
Astragal
Bottom section
Milford pin
Counterbalance cable
IMPORTANT: RIGHT AND LEFT HAND IS ALWAYS
DETERMINED FROM INSIDE THE BUILDING LOOKING
OUT.
NOTE: For door section identification see page 4.
FAILURE TO ENSURE TIGHT FIT OF CABLE LOOP OVER
MILFORD PIN COULD RESULT IN CABLE COMING OFF
THE PIN, ALLOWING THE DOOR TO FALL, POSSIBLY
RESULTING IN SEVERE OR FATAL INJURY.
Uncoil the counterbalance cables and slip the loop
at the ends of the cables over the milford pins on
the bottom section. Insert a short shaft roller in the
bottom bracket on the bottom section and another
short shaft roller in the #1 end hinge at the top of the
bottom section. Repeat for other side.
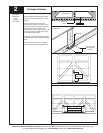
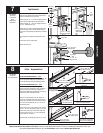
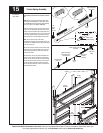
NOTE: Larger doors will use long shaft rollers with
double wide end hinges.
NOTE: Verify astragal (bottom seal) is aligned with
door section. If there is more than 1/2” excess
astragal on either side, trim astragal even with door
section.
Double wide
end hinges
Long shaft
roller
Rollers
WARNING