


– 147 –
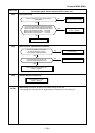
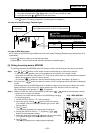
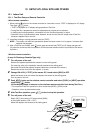
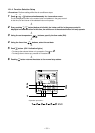
DIP switch S003
Bit 1: OFF → ON
1
2
3
4
ON
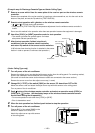
Sensor cover
Sensor board
Adjust corner cap
with sensor
12. SETUP AT LOCAL SITE AND OTHERS
12-1. Indoor Unit
12-1-1. Test Run Setup on Remote Controller
<Wired remote controller>
1. When pushing
TEST
button on the remote controller for 4 seconds or more, “TEST” is displayed on LC display.
Then push
ON / OFF
button.
• “TEST” is displayed on LC display during operation of Test Run.
• During Test Run, temperature cannot be adjusted but air volume can be selected.
• In heating and cooling operation, a command to fix the Test Run frequency is output.
• Detection of error is performed as usual. However, do not use this function except case of Test Run
because it applies load on the unit.
2. Use either heating or cooling operation mode for [TEST].
NOTE : The outdoor unit does not operate after power has been turned on or for approx. 3 minutes after
operation has stopped.
3. After a Test Run has finished, push
TEST
button again and check that [TEST] on LC display has gone off.
(To prevent a continuous test run operation, 60-minutes timer release function is provided to this remote
controller.)
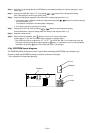
<Wireless remote controller>
(4-way Air Discharge Cassette Type only)
1 Turn off power of the unit.
Remove the adjuster attached with sensors from the ceiling panel.
For removing, refer to the Installation manual attached to the ceiling panel.
(Be careful to handle the adjuster because cables are connected to the sensor.)
Remove the sensor cover from the adjuster. (1 screw)
2 Change ON of Bit [1: TEST] of the sensor P.C. board switch [S003] to OFF.
Mount the sensor cover and mount the adjuster with sensor to the ceiling panel.
Turn on power of the unit.
3 Push
ON / OFF
button on the wireless remote controller and select [COOL] or [HEAT] operation
mode using
MODE
button.
(All the display lamps of sensors on the wireless remote controller flash during Test Run.)
• Do not perform Test Run operation in other modes than [HEAT] / [COOL] mode.
• Detection of error is performed as usual.
4 After Test Run operation, push
ON / OFF
button to stop the operation.
5 Turn off power of the unit.
Return Bit [1] of the sensor P.C. board switch [S003]
to the original position. (ON → OFF)
Mount the adjuster with sensors to the ceiling panel.