


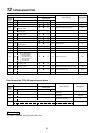

16
10
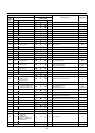
APPLICABLE CONTROLS
NOTIFICATION
When using the equipment at the first time, it will take a lot of time that the remote controller accepts an
operation after power was on. However, it is not a trouble.
• Automatic address
• While automatic addressing, the operation cannot be performed on the remote controller.
• For automatic addressing, Max. 10 minutes (generally, approx. 5 minutes) are required.
• When power will be turned on after finish of automatic addressing;
• It will require Max. 10 minutes (generally, approx. 3 minutes) that outdoor unit starts operation after power was on.
As all have been set to [Standard] at the shipment, change the setup of the indoor unit if necessary.
To change the setup, use the main remote controller (wired remote controller).
The wireless remote controller is unavailable for address setting.
* The setup change for wireless remote controller, sub remote controller, or remote controller-less system
(Central control remote controller only is provided.) is impossible. In these cases, prepare and mount a
separate main remote controller.
Exchange of applicable control setup
Basic operation procedure for setup exchange
Change the setup while operation of the equipment stops.
(Be sure to stop the operation of a set.)
Procedure
1
2
3
4
5
6
Description
When pushing
SET
,
CL
, and buttons simultaneously for 4 seconds or more, after a while, the display part
flashes as shown in the figure.
Check that the displayed item code is [10].
• If the item code indicates other than [10], push
button to erase
the display, and then retry the operation from the first step.
(For some time after button has been pushed, the operation of
the remote controller cannot be accepted.)
(In a group control, the firstly displayed
indoor unit No. becomes the header unit.)
Every pushing
UNIT
button, the indoor unit No. in the group control is displayed successively. Select an
indoor unit of which setup to be changed.
In this time, the position of the indoor unit of which setup to be
changed can be confirmed because the fan and the flap of the
selected indoor unit work.
Using , buttons of set temperature, specify the item
code [
**
].
Using , buttons of timer time, select set data [
****
].
Push
SET
button. In this time, if the display changes from flashing to lighting, the setup completes.
• To change the setup of an indoor unit other than the selected one, start operation from Procedure
2
.
• To change the setup of another setup in the selected indoor unit, start operation from Procedure
3
.
Pushing
CL
button clears the set up contents which have been already set. In this case, retry from Procedure
2
.
When the setup finished, push button. (The setup is determined.)
Pushing
button deletes the display and returns the status to
normal stop status.
(For some time after button has been pushed, the operation of
the remote controller cannot be accepted.)
(* The display changes according to the indoor unit model.)
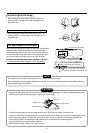
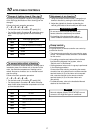
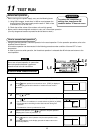
UNIT
SET
CL
UNIT No.
CODE No.
R.C. No.
1
4
6
2
3
5
UNIT No.
CODE No.
R.C. No.
UNIT No.
CODE No.
R.C. No.
** **
** **
*
**