


Dehumidifying Dryers Chapter 3: Installation 22 of 59
3-5 Initial Start-up
Pre-Startup Checks
; Check the process and return hoses for tight connections.
; Check all companion equipment, such as the drying hopper; verify that the loading
system is ready for operation.
; Verify that all dryer electrical connections are tight.
Starting Up the Dryer
1. Turn on (energize) the disconnect switch in your power drop, then turn on the one on
the dryer.
2. Turn the system ON/OFF switch to ON to energize the display panel.
3. Close the slidegate at the bottom of the drying hopper.
Make sure that the blowers turn in the right direction.
4. Fill the drying hopper with material.
5. Turn the dryer ON switch to START to start the dryer.
The process blower starts.
6. If your dryer has a water-cooled aftercooler, make sure that sufficient cooling water
(3gpm at 85°F or lower) flows properly through the coil and that you have bled any
trapped air from the system. Make sure the aftercooler has the proper supply water
temperature.
7. Set the process set point on the temperature controller.
8. After the proper pre-drying time for the initial hopper fill has elapsed, fully open the
drying hopper slide gate.
9. Turn on the machine convey ON/OFF switch to ON, and set the convey timer for the
proper conveying time.
Note: To allow proper residence time during continuous processing,
maintain the material level in the hopper at the midpoint of the air trap
assembly.
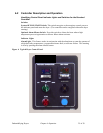
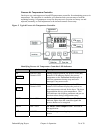
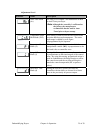
Auto-Tuning the Dryer
1. For Auto-tuning, press the beige button once. The AT screen will show with the
setting OFF.
2. Press the UP arrow to change the setting to ON.
3. Press the beige button again to go back to the Temperature Screen. Your actual
temperature will start to flash for about 10-20 minutes with the temperature
fluctuating up and down during that period. After the flashing stops, it means auto-
tuning has finished.