


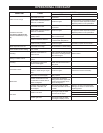
29
Prepare the Up-N-Down Transfer Kit
The next step is the preparation of the Up-N-Down Transfer Kit,
if you have not already done so:
1. With the 5 gallon Up-N-Down container in the vertical position,
unscrew the plastic vent cap in the handle and pierce the
plastic membrane over the vent boss under the cap to allow
the container to vent.
Note: If your container does not have the vent cap and vent
boss, drill a 3/16” hole in the handle. When you have nished
deliming you will be able to plug this drilled vent with the
stainless steel screw that is supplied with the kit.
2. Remove the container’s cap and cut the plastic membrane
located in the 3/4” IPT opening in the cap. Take care to not
damage the threads.
3. Find the 3/4” male adapter, apply teon tape to the threaded
end and screw it into the 3/4” IPT opening in the cap.
4. Put cap with male adapter back on the container and slide
3/4” hose over end of male adapter and fasten in place using
hose clamp provided.
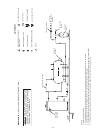
Delime using Flo-Jug Method
5. Slide the hose clamp over end of hose and slide hose over the
male adapter in the water heater drain opening and secure in
place using hose clamp.
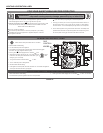
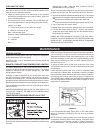
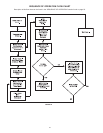
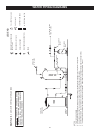
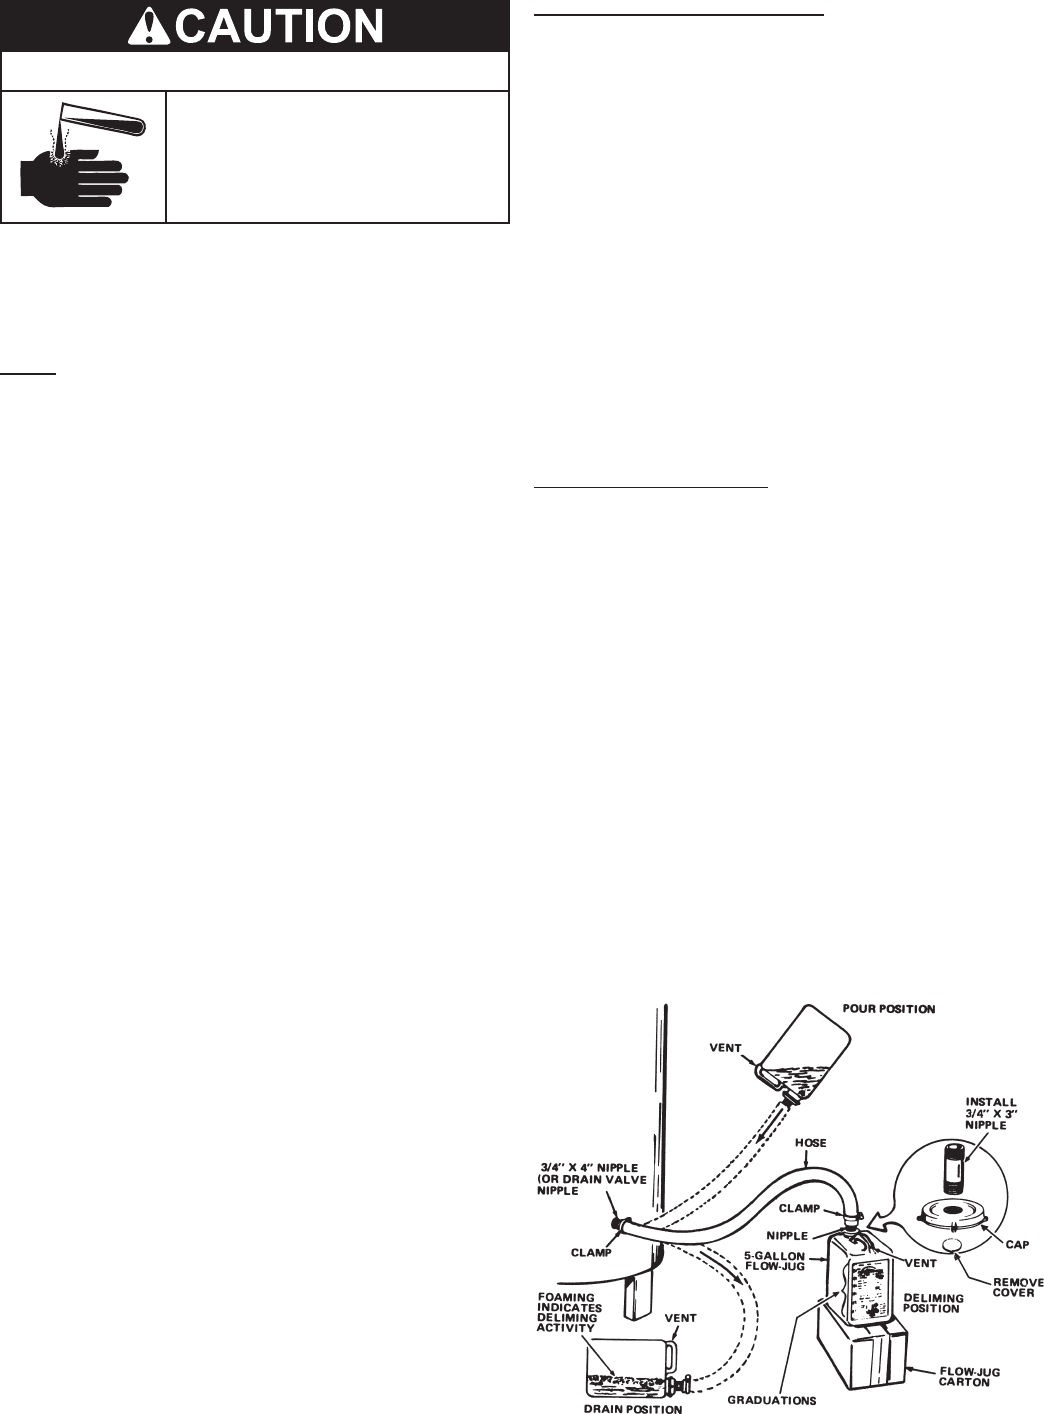
6. Lift container to the “Pour” Position, see Figure 28, being
careful to keep the vent in the handle above the liquid level
and pour the UN•LIME into the heater.
7. Lower container, you may have to place the container on its
empty carton to prevent the UN•LIME from owing back into
the container.
8. Let UN•LIME remain in the heater for 5 minutes and then
lower the container to the “Drain” Position, see Figure 28.
9. Deliming activity is indicated by foaming on the surface of the
UN•LIME. If there is deliming activity, repeat steps 6 thru 8.
Normally, lime removal will be completed within one hour.
Severe build-up of lime may take longer than an hour to complete
descaling.
Note: To check UN•LIME for continued use, place some scale
or white chalk in a glass with a small amount of UN•LIME. If
the material is vigorously dissolved by the UN•LIME, it can be
reused; if not, the UN•LIME should be replaced.
FIGURE 28.
Chemical Hazard
• Product contains phosphoric acid.
• Keep out of reach of children.
• Use rubber or neoprene gloves.
UN•LIME contains phosphoric acid. In case of external contact,
ush with cool water. If irritation persists, get medical attention. If
swallowed, give 1 or 2 glasses of water or milk and call physician.
Get immediate medical attention for contact with eyes. Keep out
of reach of children.
NOTE: THE USE OF RUBBER OR NEOPRENE GLOVES IS
RECOMMENDED, ESPECIALLY IF YOU HAVE ANY OPEN
SORES OR CUTS TO AVOID UNNECESSARY IRRITATION
OR DISCOMFORT.
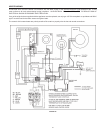
1. Turn off fuel and/or power supply to heater. Also, turn off power
to any electrical device or equipment, which is attached, or
part of the system.
2. Open hot water side of faucet closest to heater and allow
water to run until it is cool enough to handle safely.
3. Close cold water inlet valve to heater.
4. Connect hose to drain valve at bottom of heater and start
draining heater into suitable oor drain area.
5. Remove relief valve while heater is draining. NOTE: Do not
replace relief valve until deliming is completed. Relief valve
opening will also act as a vent in case of possible contact
between the delimer and the anode rod(s), which may
produce ammable hydrogen-air mixtures.
6. If relief valve appears to be limed-up, place it in a clean glass or
plastic container adequate in size so that you can pour enough
UN•LIME® into the container to cover the valve and allow
space for foaming. When foaming stops, run fresh cool water
into the container and rinse the relief valve for a few minutes.
7. If heater does not drain completely after a reasonable length
of time, turn off the main water supply valve to stop water from
entering the tank due to a by-pass problem or defective cold
water inlet valve. Also, check for clogged drain valve opening.
Heater must be completely drained before introducing UN•LIME.
8. Remove the cleanout cover and place a clean plastic bucket
next to the cleanout opening.
Partially open the cold water inlet valve to allow time to
accomplish the following and then close the valve.
While the water is being run through the tank, insert a stiff
wire, copper tube attened at one end or an opened wire coat
hanger through the cleanout opening and scrape out any
loose deposits of scale or sediment. This is an economical
way to avoid unnecessary usage of the deliming solution.
Repeat the opening and closing of the cold water inlet valve
as necessary but be sure the heater is completely drained
when ready to introduce the UN•LIME.
Upon completion, reinstall the cleanout cover and use a new
cleanout cover gasket (part number 9004099215).
Remove the drain valve.
9. Install the long plastic male adapter insert tting into the drain
valve opening of heater after applying Teon tape or paste to
threads. Tighten rmly by hand and use wrench or adjustable
pliers to check for secure connection. Do not over tighten to
avoid damage to threads and ttings.