


90
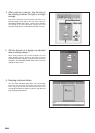
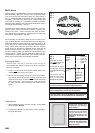
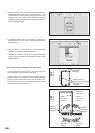
3. Select a large design or individual design elements
and arrange them in the hoop area on the screen. The
example shown uses lettering and designs from the
Design Library that is built into the software. (Additional
numbered hoops will appear as the design parts ow out
of the rst hoop section).
4. The design data is sent to the machine for sewing one
section at a time. Click on the “Transmit to Machine” tool
on the tool bar.
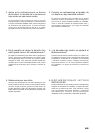
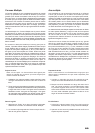
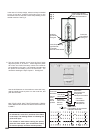
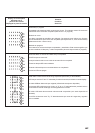
5. The grey area (#1 Hoop) is the first of the embroidery
data that is sent to the machine for sewing.
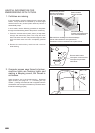
Set fabric and stabilizer into the hoop, aligning cross lines
of data 1 within the guide line markings of the hoop. (See
gures 2 and 3).
Data 1
Donnée 1
Datos 1
Data 4
Donnée 4
Datos 4
Data 2
Donnée 2
Datos 2
Data 3
Donnée 3
Datos 3
A
B
C
Fig. 4
Fig. 4
Fig. 4
Fig. 3
Fig. 3
Fig. 3
Guide line
Ligne Guide
Línea guía
Guide line
Ligne Guide
Línea guía
Guide line
Ligne Guide
Línea guía
Guide line
Ligne Guide
Línea guía
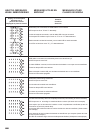
There are two sets of markings on the inner hoop.
On each side of the hoop there is a Center Hoop line
which indicates the exact center of the hoop.
In each corner of the hoop there are markings which
together define the maximum sewing area for Multiple
Hooping. These marks are referred to as Guide lines.
Guide lines are to be set on the horizontal and vertical
cross lines on the fabric as shown.
Center point line
Ligne de point centrale
Línea del punto
de centro